Thursday, February 18, 2010

veggie painting: fail

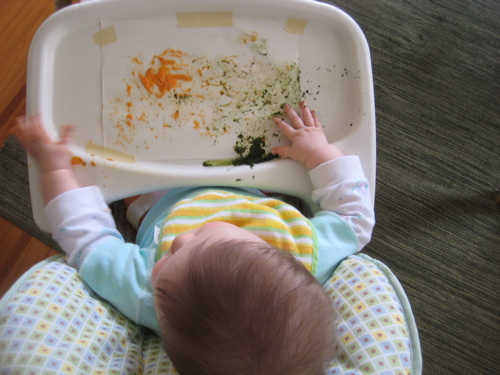
veggie painting 1

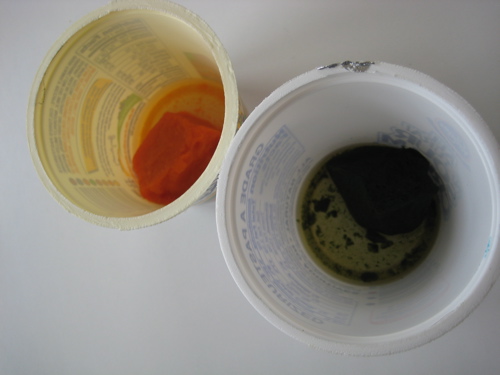
Over the weekend, the Little Pea tried her hand at arts and crafts. I had this great idea that she could try veggie painting and make valentines for her papa and her grandparents. To me, Valentine's Day is just another excuse for an art project.

At work we do veggie painting with bigger kids (by "bigger" I mean probably 3 and up). You lay a piece of unbleached muslin over top of some colorful veggies (carrots, kale, chard and beets are great choices), and then you use a blunt (safe) tool to smash and smash, and "paint" on the fabric. It's a lesson about veggie color - the more colorful the veggie, the better it is for you to eat. The paintings are very abstract, but kids always like them.

Anyhow, since we have plenty of ice-cube-sized lumps of pureed vegetables in the freezer, I thought we could try a variation on the smashing, and let the Little Pea try out finger-painting instead.

veggie painting 2
carrots and spinach

I can't say that this project was a success. The veggies didn't stain paper the way that they do with fabric. And even though I added some corn starch to try to make the "paints" goopier, they were much too liquidey, and the paper got mushy and tore.

Of course, torn paper was the best part of this project for the Little Pea, who didn't really understand why she was strapped into her high chair with food but nobody feeding her anything. At least she could tear paper and shove it into her mouth! Now that's fun.

She did get to try another art project the next day, when she was sitting on my lap while I colored a Valentine for HWWLLB. She grabbed the colored pencils and bashed them artistically on some paper. I added a heart, and presto! Baby's first valentine.

Monday, February 08, 2010

dyrrwurm

Many days on end of cold, wet, icy weather have led to short bursts of creativity around here with the materials we have on hand.

dyrrwurm

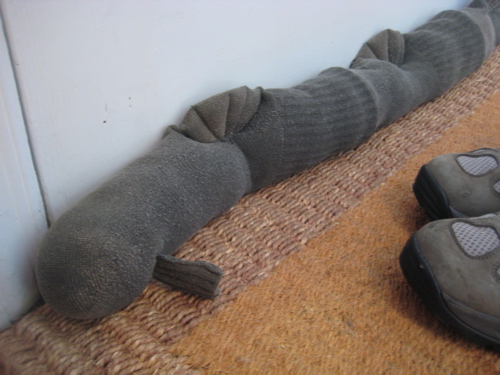
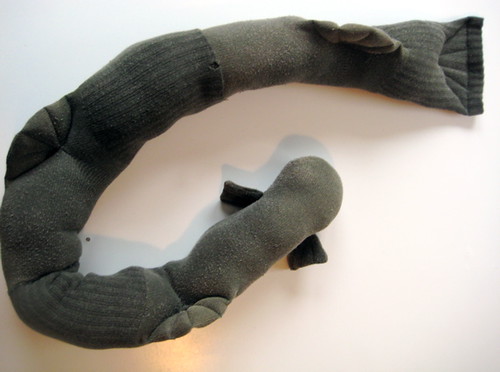
Dyrrwurm is now guarding our back door, keeping out the nasty, cold draft that was coming in under our vintage 1952 door (which really ought to be replaced with a more insulated model). He was made from two pairs of identical socks that HWWLLB gave me recently for the purposes of sock monster making. Before his reincarnation as two pairs of men's socks, Dyrrwurm lived at the back door of the land of the giants, in the far, far north, where his hobbies included writing epic poetry, collecting pictures of his idol, the Earth Serpent, keeping out the cold draft, and doing pedicures for his dragon friends.

You can make your own door dragon - it's quite easy, even for sloppy, inexpert sewers like me. This project was done in two bursts - it took me one naptime, and one visit from the Little Pea's favorite Auntie to complete. You will need:

- 2 pairs of heavy socks in a dragoney color
- matching thread
- sewing machine
- a few pins
- polyester fiberfill or some other stuffing (rags are fine too)
- something heavy for inside - I used sand, but you could use dry beans, rice or pebbles
- four or five repurposed plastic bags to hold the heavy stuff

My door dragon is only three socks long, since my door is narrow. But for a standard-width door, you will need to make the dragon four socks long.

door monster tutorial 2

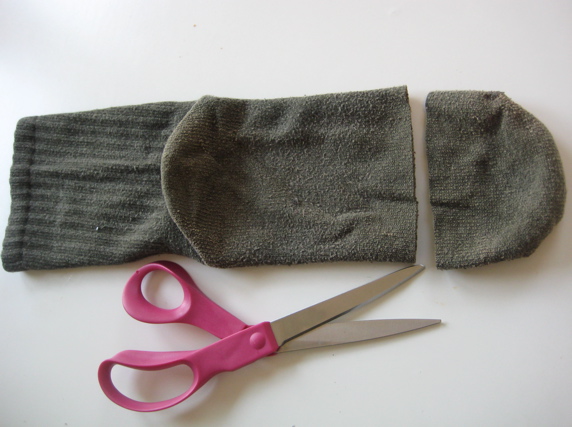
Cut the toes off all the socks except one - this will be the head. Sew the socks together cuff-to-toe, right sides together. Try to keep them lined up so that all the heels are basically running in one line down the dragon's back. Turn right-side out and admire your long, wiggly new friend.

door monster tutorial 7

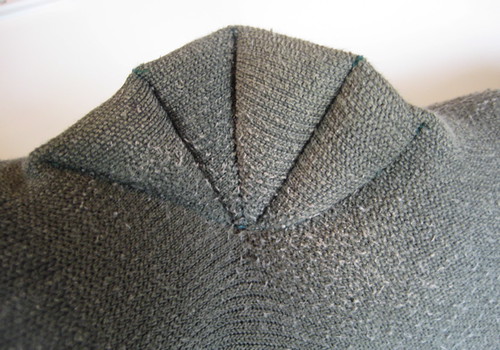
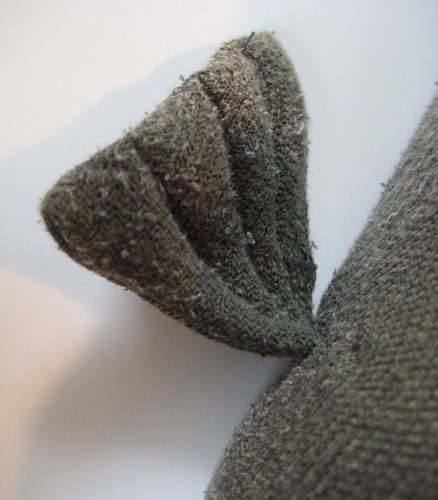
Starting at the head end, put a small amount of stuffing inside each heel, flatten and pin down. Then sew the heel shut to make a fin. You can add some decorative stitching as I did to make it more fin-like. Repeat for each heel.

door monster tutorial 1

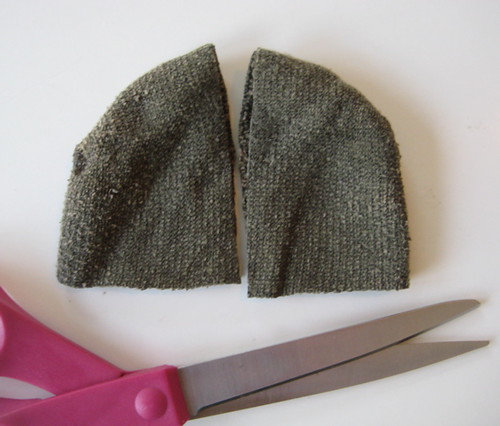
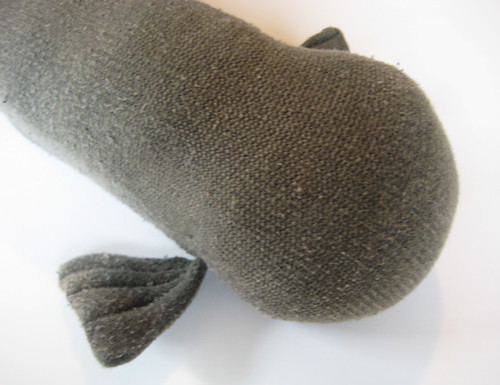
Use one of your cut-off toes to make front flippers if you like. Lay the toe flat and cut it in half up the middle. Turn inside-out and sew it into a triangle, leaving an open gap for stuffing. Turn the flipper right-side-out and stuff with a small amount of stuffing. Smoosh flat and sew shut. Add some decorative stitching to flatten the flipper and make it fancier.


Turn the dragon inside-out again. Cut a hole on each side of the foremost sock. Stick the flipper through so that the flipper is now "inside" the dragon and the sewn-shut edge is facing towards you. Sew the flipper into place. Once you have the flippers in place, turn right-side-out again.

door monster tutorial 8

Stuff the head firmly with stuffing, but leave the body un-stuffed. Isn't he cute?

Get out your heavy stuff - sand, dry beans or rice, pebbles, whatever you have on hand - and put a bit inside four plastic bags (repurposed bread bags worked nicely for me). Tie them each tightly. Pull one into your dragon, all the way up to the head, and secure in place (you can sew it or be lazy like me and use a safety pin). Use your stuffing to lightly stuff and shape the dragon around that heavy bit. Repeat with each bag of heavy stuff until your dragon is fully stuffed (and heavy). Leave the heavy stuff out of the very end of the tail if you can. Now your dragon will lay heavily in place on the floor.

door monster tutorial 5

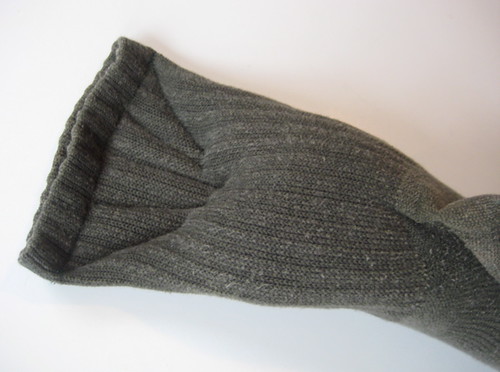
Stuff the tail end very lightly with stuffing. Sew the tail shut across the final sock cuff. Add some fancy stitching to make the tail flatter and more tail-like. Embroider on a face if you like. Enjoy the new absence of a draft under your back door!

door monster tutorial 4
honey, you need a pedicure!

Wednesday, February 03, 2010

tips for great knitted baby gifts

little red top

So you've got a friend with a new baby on the way, and you want to knit the little bundle something adorable, something beautiful, something practical enough to wear a lot, something to make the new parents squeal with delight? Right?

I've knitted a lot of baby gifts in my time, and now that I've got such a little bundle of my own, I look back with a twinge of regret at some of the well-meaning baby gifts I've knitted over the years. I know that a few were well-received and worn quite a lot (I just saw a friend's three-year-old dragging around a sweater I made for her when she was just over a year!), but I could name a dozen that may have been cute on the needles, but probably didn't make it out of the dresser drawer very often.

So without further ado, here are a few suggested guidelines for knitting fabulous baby gifts, courtesy of me. Please do leave your further suggestions in the comments!

- Washability: My baby spits up about once every ten minutes (on a good day). We do a LOT of baby laundry, and I don't think we're unusual. Choose fibers that can be machine washed. I don't think you need to choose something that can go through the dryer, because frankly, not much quality yarn can. Personally, I hate the dryer and air dry as much as I can, but you really want to make life easy on the new parents. Whatever fiber you choose, do include washing instructions with your gift. Your friends will feel truly terrible if they destroy your gift with a trip through the laundry.

- Another word on fiber: make sure it's soft enough for very delicate skin. One good way to check is to stick the skein inside your collar and walk around the yarn store for a few minutes with the yarn smooshed against your neck. Feel even the slightest twinge of an itch? That yarn is probably too itchy for a wee one. My favorite yarn, for softness on skin and on the planet, is Blue Sky Alpacas line of organic cottons. Heavenly soft!

- Nap-ability: No buttons or snaps up the back. Babies spend a lot of time sleeping on their backs, and a big ridge of bumpy buttons is not very comfortable. Keep your buttonage to the sides or front. If you need a back-neck closure, go for a tiny tie-up instead.

- Button safety: While we're on the subject of buttons, you should know that buttons are generally a choking hazard for babies. You can make a cardigan with buttons, but you need to sew those things on for dear life. Sew as you've never sewn before, and then sew some more for good measure. Better yet, use a zipper, velcro tab or tie-up instead.

- Practicality: The more wearable your gift is, the more it will be appreciated (and worn). I love baby booties, but I'm still searching for the pair that won't fall off. Besides which, a big pack of baby socks costs less than many fancy coffee drinks. The Little Pea will wear hats, but many babies yank them right off. The most practical baby knits I've tried are hoodies, cardis (especially those that zip), throw-sized blankets, bonnets (hats that stay on!), pullover sweaters with a nice roomy neck, and those wonderful, insane full-body hoodie things with the hand and foot covers (though ours is a fleece one from L.L. Bean).

- Neck room: Babies have big giant pumpkin heads. If you're knitting a pullover, make sure that you're knitting a nice big neck opening. Look for an envelope neckline or a collar that opens along the front or shoulder to accommodate the noggin.

- Bulk: I find shoulder and sleeve seams get very bulky on a tiny little baby sweater, especially if your yarn is any heavier than fingering weight. They are working so hard to learn how to use those little arms and hands, and being able to put a thumb or finger into the mouth is often the difference between a happy baby in the carseat and one who is making themselves and everyone else very, very cranky. You might be surprised at how little bulk it takes to keep that hand from making it to the mouth. To that end, I really love seamless baby sweaters, whether bottom-up or top-down.

- Colors: You know your friends' tastes better than I do, but I just want to caution that pink and light blue are totally played out. Babies look so good in neutral colors, and they can also wear bright colors that you only wish you could pull off. Pastel colors don't look good on many people, and babies are people, too.

- Fun: The most important thing in any knitting project is that you enjoy making it. If it's a bear to knit, that doesn't make it a better gift. Have a good time doing it!
Sunday, January 31, 2010

falling in love with EZ

Isn't it wonderful to make a new friend?

The giddy early days of a new friendship are so much like a new love. The curiosity, the thrill at each new little discovery (she likes recycling, too!), the days on end spent in each other's company, missing them when they have other plans, wondering if you're becoming a bit of a stalker (but not really caring)...

Sometimes when I pine for dear old friends, I think fondly of the early days and sigh and wonder if I'll ever feel that way about someone again. But of course, you never know when love will strike.

The infatuation of new friendship seems to have struck me again, out of the blue. I was sitting at home, minding my own business, thumbing through the Knit Picks catalog and noticed that they had a huge sale on books (40% off through Feb 22). I had to order just a tiny bit of yarn for a project, and decided while I was at it to pick up a copy of The Opinionated Knitter, the collection of Elizabeth Zimmerman's newsletters from 1958-1968.

Thus, a beautiful new friendship was born. Well, okay maybe you can't call it a friendship since she passed in 1999 and all I get to do is read her books and knit her designs, but still, I really feel as if I've made a new friend. I love her voice, that sparkly, slightly prickly but loving personality that shines through on every page. I love her down-to-earth, empowering approach to knitting. I love that there are photos of her family and friends on nearly every page. I really do feel as if I'm getting to know this remarkable woman, to admire her and probably emulate her, just as I have done with a handful of very dear female friends over the years.

I can't believe I've knitted more than ten years now without her. This is a bit like when I read all those Willa Cather novels last summer, and realized that I had been thinking of myself as a reader of American literature, when without Willa I'd hardly known a thing about it. Without Elizabeth, I haven't been much of a knitter.

Despite the short stack of half-finished projects (all birthday presents!!) staring reproachfully at me from the knitting basket, I am really itching to knit some great big wooly Scandinavian Ski sweaters. And don't get me started on the Baby Surprise Jacket - it's time, it's time. I already know that reading EZ is going to change my approach to design and especially to pattern-writing, much for the better I hope.

Ah, new love! It's like a breath of spring on this chilly, clear winter morning.

Do I sound totally infatuated??

Saturday, January 23, 2010

on the importance of felting a swatch

oh, sh#$t!
fez or propeller beanie?

This week I learned a painful but important knitting lesson: felt a swatch!

If you're going to felt a new yarn, or a yarn other than the pattern calls for, save yourself the agony and knit up a little swatch & felt it first. How long does it really take to knit a gauge swatch and then felt it? How many years of felting have I managed to get through so recklessly?

It's true, it will delay your project by a couple of hours. But oh! the humanity. You should see the mess I've made. $30 worth of scrumptious alpaca-cashmere-merino yarn and a week and a half of my precious, precious knitting time are down the drain. That horrible fez-like thing at the top of the page is the result of my hastiness. It was meant to be a jaunty, vintage-style cloche for my sister's birthday, which by the way is tomorrow. Did I mention the agony???

This actually happened the other night, but paralysis set in, and just this morning I got back on my feet, ordered some replacement yarn (an old standby, Merino Style - forget this experimental luxury baloney) and bought my sister a stand-in trinket until her specially-ordered cloche is ready. It feels good to move on, it really does.

So the moral of the story is: don't be lazy like me. Knit, measure and felt a gauge swatch before you start that felting project, unless you're using Cascade 220 for the hundredth time and know what you're getting yourself into. I used to be one of those reckless felters, but I've learned my lesson, oh have I ever.

Monday, January 18, 2010

creative turmoil

In 1964, Dr. Martin Luther King, Jr. was awarded the Nobel Peace Prize. Believe it or not, there were many then who asked why he won, when he hadn't accomplished his goal yet. The National Voting Rights Act had not yet been passed, and racial segregation and intimidation was still rampant in the United States, especially in the South.

King raised this point himself in his acceptance speech:

"I am mindful that only yesterday in Birmingham, Alabama, our children, crying out for brotherhood, were answered with fire hoses, snarling dogs, and even death. I am mindful that only yesterday in Philadelphia, Mississippi, young people seeking to secure the right to vote were brutalized and murdered. I am mindful that debilitating and grinding poverty afflicts my people and chains them to the lowest rung of the economic ladder.

"Therefore, I must ask why this prize is awarded to a movement which is beleaguered and committed to unrelenting struggle, and to a movement which has not yet won the very peace and brotherhood which is the essence of the Nobel Prize. After contemplation, I conclude that this award, which I receive on behalf of that movement, is a profound recognition that nonviolence is the answer to the crucial political and moral questions of our time: the need for man to overcome oppression and violence without resorting to violence and oppression."

Looking back, it seems to me that the Nobel Prize committee was not only affirming the rightness of Dr. King's nonviolent approach, but lifting up a beacon of hope for oppressed peoples around the world. I think they also saw an opportunity to provide Dr. King and his movement with a huge dose of encouragement and validation before their nation, and before the world, that could help bring about the change for which they were marching.

In this speech, Dr. King speaks of living in a dark and uncertain time, and of his fervent belief that the struggle is one full of hope: "When our days become dreary with low-hovering clouds and our nights become darker than a thousand midnights, we will know that we are living in the creative turmoil of a genuine civilization struggling to be born."

There is so much darkness and uncertainty in our world, and so many nay-sayers who criticize and find fault with those who speak of hope and put their stock in the future rather than grabbing what they can get in the present. I love this speech because of the way Dr. King uses the international forum to brush the critics aside, and to confer the honor of the moment not to his own movement, but to the "humble children of God" who are "willing to suffer for righteousness' sake."

I hope that you are celebrating this national day of service today. Take a moment to read Dr. King's Nobel Prize acceptance speech, and hopefully to find a new spirit of hope in these dark and uncertain days.

Sunday, January 03, 2010

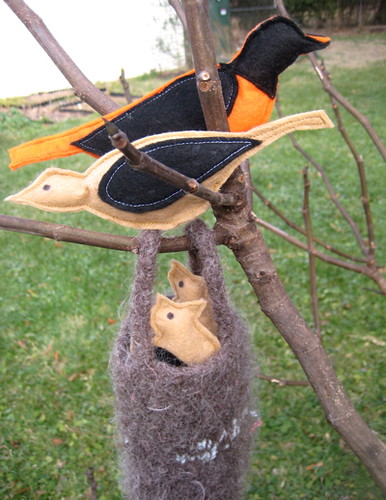
oriole family nest

feltie_orioles

For Christmas I made the Little Pea a toy orioles' nest with a family of orioles inside.

She likes to touch and squeeze them, especially the bright orange Papa Oriole. I think as she gets older she'll enjoy taking them out of the nest and putting them back in, over and over.

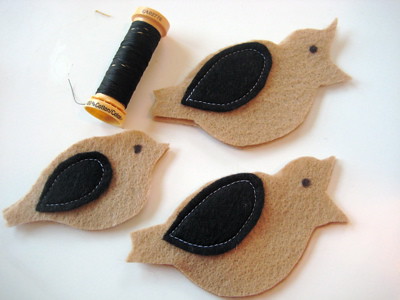
The inspiration for this toy was the Charley Harper silk screen of an oriole clinging to his nest in the wind. My first thought was how much the nest resembles a felted purse. His bold, 2-dimensional birds made me decide to use craft felt for the birds themselves, and sew a relatively 2-dimensional toy bird that was still soft and fun to clutch.

felt_oriolecutouts

At first I had planned to make a bird house with lots of different kinds of birds inside, but as I started the planning I realized that I didn't want the Little Pea to think that an owl and a sparrow might live together harmoniously in the same house, so I opted for a bit more realism instead.

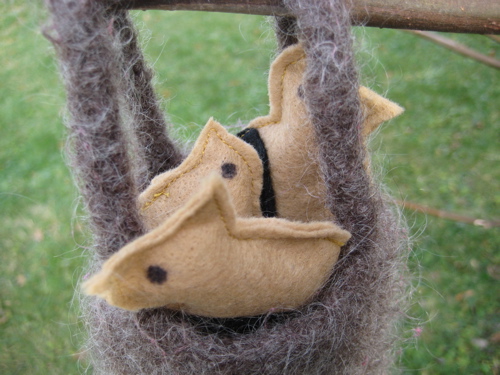
The nest and birds are all life-sized (more or less), and I tried to make the nest resemble what orioles really make, which is a shaggy pouch that incorporates whatever materials they can find nearby, and usually has some soft fluffy stuff near the bottom to insulate and cushion the eggs (and then the babies when they hatch).

It was a lot of fun to make, and I've decided that this was the prototype for more bird families to come. Next time I'm going to use felted sweater bits and needle-felting for the birds. As much as I like the poppy, paperlike quality of the craft felt, it's not a great material to work with, and I'm more comfortable working with wool. Besides, I'm not sure what kind of dye is used on craft felt, and my kid is sticking this thing in her mouth quite a bit.

feltie_babyorioles

Stay tuned for more hatchlings as spring approaches!