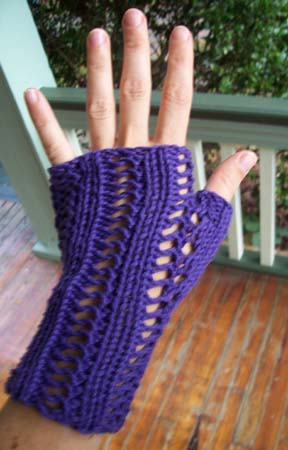
These fingerless gloves are lightweight, knit in a lace rib that’s very easy to memorize, and can knit up in a flash. You can buy your yarn on Saturday afternoon and wear them out on Saturday night! I also find them to be a great accessory for working in an over-air-conditioned office (like mine). They only use about 1/2 skein of Cotton Fleece (around 100 yards), so they’re a great project for using up leftovers.
These are knit flat and then sewn up the side seam, but you could work the whole glove in the round on DPN’s if you prefer - just leave out the extra stitch for the side seam.
Size: Adult S (L)
Materials:
- About 1/2 skein of Brown Sheep Cotton Fleece (80% cotton, 20% merino). Shown in color #CW730, Raging Purple.
- Size US 6 needles, straight or circular, and one set of size 6 DPN’s.
- Tapestry needle
- Stitch marker
Before casting on, cut a 12” length of scrap yarn (you will use it to hold your thumb gusset stitches later).
Lace rib pattern:
R1 (RS): *K2, P3. Repeat from *.
R2 (WS): *K1, YO, K2 tog, P2. Repeat from *.
Knitting the glove (make two):
Cast on 26 (31) st. Work glove in lace rib as follows:
R1 (RS): Work in lace rib to end of row, K1.
R2 (WS): P1, work in lace rib to end of row.
(The extra stitch on the end of the row makes it easier to sew up the side seam. If you are knitting in the round, you may omit this extra stitch – ie, cast on 25 (30) instead of 26 (31) st).
Continue in lace rib until piece measures about 2-3/4 (3) inches.
Next RS row: Patt 12 (17), PM, YO, YO, YO, PM, patt to end. You have just created a thumb gusset between the two stitch markers. In future you will only add stitches to the thumb gusset on RS rows. On WS rows, simply purl all thumb gusset st.
Continue in lace rib patt, increasing 2 st between the markers on EVERY OTHER RS row as follows:
Patt to marker, slip marker, YO, knit all thumb gusset st, YO, slip marker, patt to end of row. 2 st increased.
Continue increasing 2 st at the thumb gusset every other RS row until there are 11 (13) st between the markers.
Next RS row: Patt to first marker, remove marker, place all thumb gusset st on the piece of scrap yarn to hold for later, remove second marker and join the first section of lace rib to the second section of lace rib by continuing across active st in lace rib pattern. At this point you will have 26 (31) st on your needle, and 11 (13) thumb gusset st on scrap yarn (making a little thumb cone that sticks out from the middle of your work on the RS).
Cont knitting in lace rib pattern until the glove measures about 6-1/2 (7) inches from the CO edge. BO loosely in K2 P3 ribbing on the final RS row.
Next, place your thumb gusset st on the DPNs, spreading the st evenly across 3 needles. Pick up one extra st from the body of the glove to make an even number of st across the DPNs.
Knit the thumb in the round on your DPNs using a K1 P1 rib. Knit 4 rows in the ribbing, then BO loosely in K1 P1 rib.
Don’t worry if it looks like there’s a little ‘hole’ where the thumb attaches to the body – it will blend in nicely with the lace pattern.
Sew up the side seam and weave in loose ends.
important notice: This is a free pattern and you are welcome to use it for all the non-commercial purposes you like. However, you may not reproduce this pattern to sell, and you may not sell what you make with it. You may donate what you make with it to charity, and you may use it for charity fundraisers only if 100% of the proceeds are donated to the charity (and by charity I don't mean your kid's college fund). Thanks for understanding!
Thank you for this pattern. I think I may make some tonight.
ReplyDeletewhat if you can't knit, but you really really need a pair?
ReplyDeletelovely gloves!
ReplyDeletelike madonna
2006.
These are NICE looking! I'm going to try to make a pair for my daughter. Thanks for the free patterns. :)
ReplyDeleteKaryn
I had the same problem, so I just started increasing between 2 stiches. I'm not to the end result yet. Would have been nice to have a video clip to explain.
DeleteHelp! I don't understand the multiple yarnovers for the thumb gusset. I've tried to purl into them on the following row and then on the next row they just fall apart. How do you get the stitch to hold on three yarnovers without anchor stitches between?
ReplyDeleteHelp! I got the thumb gusset all done ( I did two YO with a K stitch between, and then CO 1 stitch when the gusset was complete) and started on the hand again... and I have a HUGE ladder up one side of the thumb gusset! I'm working in the round and I can't figure out why I got the ladder... I can't see a dropped stitch anywhere...
ReplyDeleteThanks!
love this pattern, what do you do at row 2 if you are working in the round? Same pattern?
ReplyDeleteThanks.
Geal: Follow the lace rib, and then K1 at the end. Good luck!
ReplyDeleteShansu: This is the kind of problem that I wish I could be there to see in person. I hope you found a kindly knitter to help you!
ReplyDelete@ Jessica, you can use a round loom (i use the blue knifty knitters loom) for this project. Skip a couple of stitches in the side for the thumb space. I love these, ive made like, four different pairs!
ReplyDeleteI don't understand how exactly to do the thumb gusset. I've tried the triple yarn over, but it just looks like a bunch of loose stitches.
ReplyDeleteI finished it! took me a bit to figure out the marker thumb thingy but i was just being dumb. Only made one though, it was super quick but attention spans aren't a thing. You're cool and should feel special.
ReplyDeleteThank you for this wonderful and easy to follow pattern for fingerless gloves. I enjoyed making a pair for my daughter.
ReplyDeleteWhile I was browsing around I saw a blog post in which there is a picture of you knitting with your cat in your lap. I scrolled down and found instructions on how to make a rib with an edge where you first cast on stitches in a contrasting colour. Then you knit with the yarn you are going to use, and take a stitch below in the contrast line. I tried it and it gave a wonderful edge but now I have forgotten the instructions. I can't find the post though I have spent several hours looking.
Meanwhile I learnt that your cat Jackie lost her life to a tumour. I am truly sorry for your loss. I have lost a dear cat to mammary gland cancer and another to a strange bleeding disorder, that could never be diagnosed. I rescue cats all the time and now have 9 of them.. one is a cripple - found as a kitten by my daughter and the other is an amputee. I had to have her front leg amputated as it had got eaten by maggots. These are ferral cats.. but they now live happily in my home.
Thanks for your wonderful knitting help and for your lovely blogs.
Oh I am Muna, by the way.
DeleteHi Muna! Thanks for your lovely comments! I still miss my kitties.
DeleteI don't think the tutorial you mentioned was on my blog. But if you Google the phrase "how to knit stripes in the round without a jog" that might get you what you're looking for (unless I misunderstood the question). Good luck!
When starting the thumb gusset, do I increase every 2 or 4 rows? If 4, do I continue the pattern normally for the other RS rows?
ReplyDeleteHI there! You increase 2 stitches on every other right side row - so that’s every 4 rows. Just continue the pattern normally on the other RS rows. Good luck!
Delete