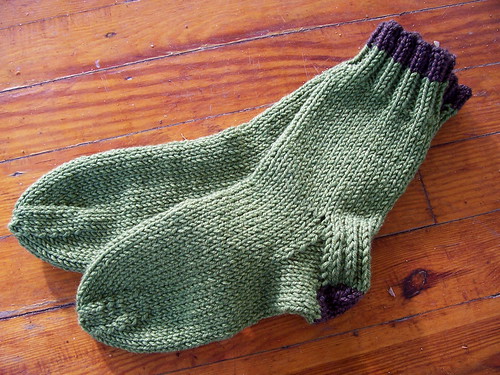
If you've never made a pair of socks before, but you've been wanting to try it, here's your chance! In honor of Socktoberfest, here is an easy pattern for a pair of simple winter socks, knitted in a large gauge so the project goes quickly. I used a superwash merino yarn that is super-soft and nicely stretchy, to make a pair of comfy, warm winter socks that you can wear with boots or just around the house.
There are about as many ways to knit socks as there are toenail polish colors, but this pattern illustrates a basic formula for sock knitting that you can use over and over again for just about any sock project. It lets you knit a basic sock in any size, and any gauge, because human feet are remarkably symmetrical (and socks are stretchy and forgiving). I deduced this formula after knitting several socks out of Anne Budd's The Knitter's Handy Book of Patterns, which was my bible when I was first learning to knit.
The basic gist of it goes like this: a 'medium' woman's foot is around 8 inches in circumference, as is her lower calf. A 'medium' man's foot is around 10 inches in circumference, as is his lower calf. I know, it sounds too good to be true, but it's just the way we evolved - for the convenience of sock knitters. So all you really have to do is knit a tube the circumference of your ankle that's stretchy and looser around the top, stick a heel in the middle, and make it long enough for your foot. Easy as pie! Really!
size: Women's medium/shoe size 7-9 US (men's medium/shoe size 9-11 US)
gauge: 4.5 stitches to the inch in st st on size US 6 needles
materials:
- 2 (3) balls Bingo Chine (100% superwash merino, 50g/88yd) in color #515, green (main color)
- 1 ball Bingo Chine in color #512, brown (contrast color)
- US size 6 DPN's
- US size 7 DPN's
- stitch marker
- tapestry needle
Start by casting on with two size 6 needles held together - this will make your ankle really nice and elastic. Then we'll switch to regular old size 7 needles for the first part of the knitting. After a little ways, we'll change to the smaller needles. This makes the upper part of the sock a little roomier to allow for the calf.
leg & ankle
CO 36 (48) st in CC on two size 6 needles held together. Spread your stitches evenly across 3 size 7 needles (1/3 of the total number of st on each needle). PM and join, knitting in K2P2 rib.
K 4 rows in K2P2 rib, then change to MC yarn.
K 8 more rows in K2P2 rib.
Next row: Change to st st. Cont knitting in st st until sock measures 2 (3) inches long.
Next row: Change to size 6 needles. Continue knitting in st st on size 6 needles until sock measures 6 (7) inches long (or desired length).
heel flap
Next row: K9 (12), turn work. Slip first st, P17 (23). You now have half of the stitches on this needle (your stitch marker should be smack in the middle of them). Arrange the remaining 18 (24) st evenly across 2 needles (you aren't going to work with these right now, but it will be convenient to have them ready this way for later). The 18 (24) st on the single needle will form the heel flap. Turn work so that the right side is facing you [notice that half of your stitches are on the heel flap needle, and 1/4 of your stitches are on each of the two other needles].
R1: * Sl 1, K1, rep from * to end. Turn work.
R2: Sl 1, P to end. Turn work.
Rep these last two rows 8 more times, until you have 18 (24) heel flap rows worked altogether [whoa, 18 (24) is half of 36 (48)!]. You will have 9(12) stitches along the selvedge on each side [oh my gawd, 9 (12) is half of 18 (24)!].
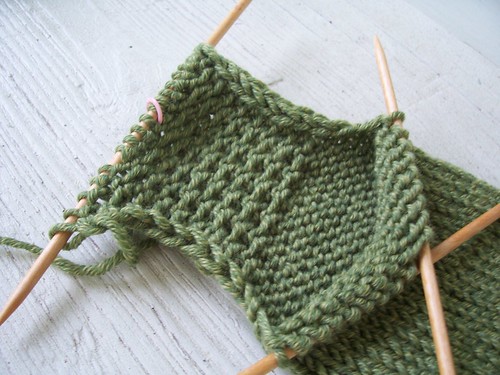
The way you worked the heel flap stitches (slipping every other st on the RS) makes the heel flap extra-dense and gives it some cushioning. It almost looks ribbed... but it isn't.
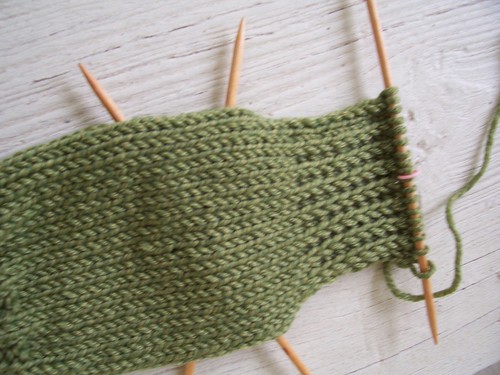
turning the heel
The right side of the work should be facing you. Change to CC yarn.
Sl the first st, then K10 (14) st, SSK, K1, turn work.
Sl 1 st, P4 (5), P2tog, P1, turn.
Next row: Knit to 1 st before the space, SSK, K1, turn.
Next row: Purl to 1 st before the space, P2tog, P1, turn.
Repeat these last two rows until you have worked all the heel st, ending with a WS row.
You will have 12 (14) heel st left on your needle.
Change back to MC yarn.
heel gusset
Sl the first st, K across all heel st, then pick up 9 (12) selvedge st, all on needle 1. With needle 2 cont knitting across all the instep st you were holding. With needle 3, pick up 9 (12) selvedge st, and K across the heel st to your marker - you are now back at the beginning of the round, in the middle of the heel. 48 (62) total st will be on your needles [did you notice how the number of selvedge st you picked up on each side was 1/4 the total number of st? You did? You're totally getting this].
Rnd 1: K to 3 st before the end of needle 1, K2tog, K1. K across all instep st on needle 2. On needle 3, K1, SSK, K to end. 2 st dec.
Rnd 2: Knit all st.
Rep rounds 1 and 2, dec 2 st every other round in this maner until 36 (48) total st remain. You will have 9 (12) st on needles 1 and 3, and 18 (24) st on needle 2 [is the synchronicity killing you???].
foot
Knitting the foot is the easiest part. You just knit round and round in st st until your the sock measures about 7-1/2 (8-1/2) inches long (or about 2 inches less than the desired overall length of the foot), measuring from the back of the heel.
toe
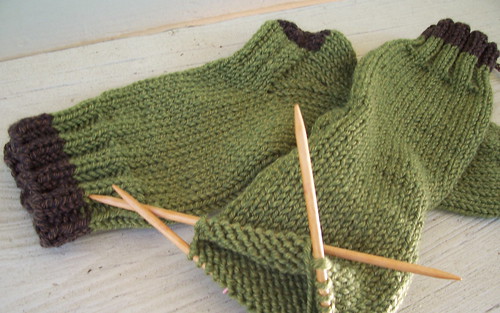
Rnd 1: Knit to last 3 st on needle 1, K2tog, K 1. On needle 2, K1, SSK, K to last 3 st, K2tog, K1. On needle 3, K1, SSK, K to end. 4 st dec.
Rnd 2: Knit.
Rep these last two rows, dec 4 st every other row in this manner until 18 (24) st rem [that's half of the total - right?].
Now dec every rnd until only 8 st rem. We're ending with 8 st no matter how many we started with - sorry to break up the halves & quarters party. Arrange the st so that you have 4 on each needle - the first and last two st on needle 1, and the middle 4 st on needle 2.
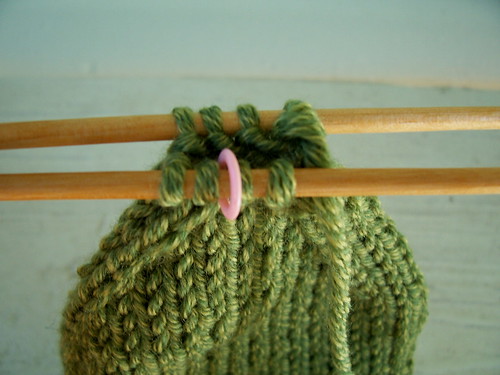
grafting the toe with kitchener stitch
Cut off your yarn so that you have about a 6-inch tail.
Using a tapestry needle, first thread the yarn through the front stitch purl-wise, leaving this stitch on the needle.
Next, thread the yarn through the back stitch knit-wise, leaving this stitch on the needle.
1. Thread the yarn through the front stitch knit-wise and slip this stitch off the needle. Thread the yarn through the next front stitch purl-wise, leaving this stitch on the needle.
2. Thread the yarn throug h the back stitch purl-wise and slip this stitch off the needle. Thread the yarn through the next back stitch knit-wise, leaving this stitch on the needle.
Repeat numbers 1 and 2 until you have grafted all the stitches together. (Tip: if you have any copies of Interweave Knits magazine lying around your house, go look up Kitchener Stitch in the glossary at the back - they have an excellent illustration).
Thread the yarn inside the sock and tie a knot discreetly inside, then weave in the loose end. Weave in all your other loose ends.
Now make another one!
PS: I knitted these socks using just a little bit of contrast color for fun. You could leave it out entirely, make more stripes in the leg, or make the toe with the contrast color as well. If you decide not to use the CC, you can forego that extra ball of yarn altogether. Just take note that for the woman's sock, if you make it any longer than I did in the leg or the foot, you're going to need another ball of the MC yarn, because 2 balls is just barely enough for this project.
important notice: This is a free pattern and you are welcome to use it for all the non-commercial purposes you like. However, you may not reproduce this pattern to sell, and you may not sell what you make with it. You may donate what you make with it to charity, and you may use it for charity fundraisers only if 100% of the proceeds are donated to the charity (and by charity I don't mean your kid's college fund). Thanks for understanding!
Thanks for the pattern!
ReplyDeleteI'm feeling really dumb. I've knitted many socks and slippers and still can't figure out "why" on the heel turn do I Knit "x" stitches, k2tog, k1 and turn. On the way back, you slip 1, Purl "x", P2tog, P1, turn, etc. What is the formula for "knowing" how many to knit across on the first row of turning the heel and the second row of purling "x" back. I know, I can follow a pattern in my sleep and have used them, but I want to know "why" I do something. Help! I love your site!! Wreckless Knitster
ReplyDelete