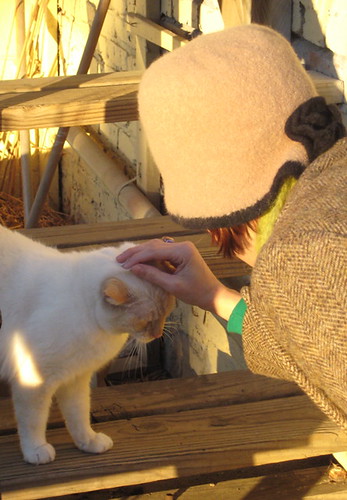
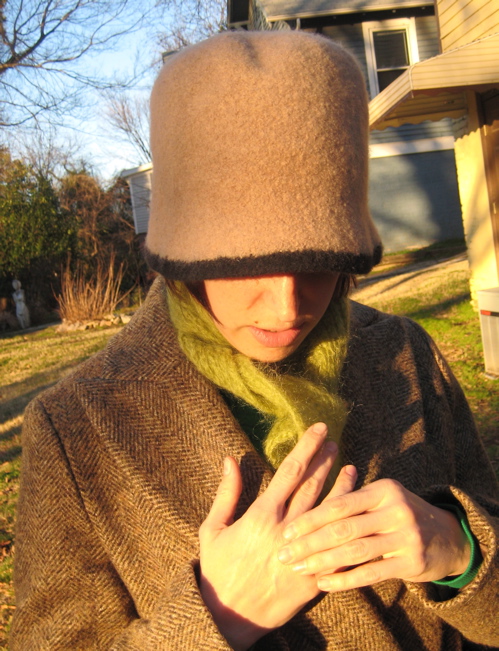
For her birthday this year, my sister requested a 1920's-style cloche hat to go with her sassy flapper haircut. I was more than happy to oblige! I love the fashions of the 1920's, especially the hats, and have always wanted to make one. After searching in vain for just the right pattern, I decided to just design one myself. I named it after one of my favorite female icons of the era, the poet Edna St. Vincent Millay.
This hat is knitted with a plied 100% merino wool for a very smooth, soft finish and uniform felting. Substitute other yarns with care.
[EDITED 10/15/08 with one correction]
size: women's one size (the hat is knitted in one size - giant - and felted until it fits the wearer snugly).
gauge (before felting): 9 stitches and 12 rows/2 inches
materials:
- 3 skeins Knit Picks Merino Style (123 yd/50g), Color #23460, Nutmeg (color A)
- 1 skein Knit Picks Merino Style (123 yd/50g), Color #23456, Coal (color B)
- 16" circular needle, size US 8 (5.0 mm)
- DPNs, size US 8 (5.0 mm)
- stitch markers in 2 colors
- tapestry needle
- pin back
- sewing needle & thread in matching colors
note on method: You will begin by working this hat flat on the circular needle. It will be joined later to knit in the round.
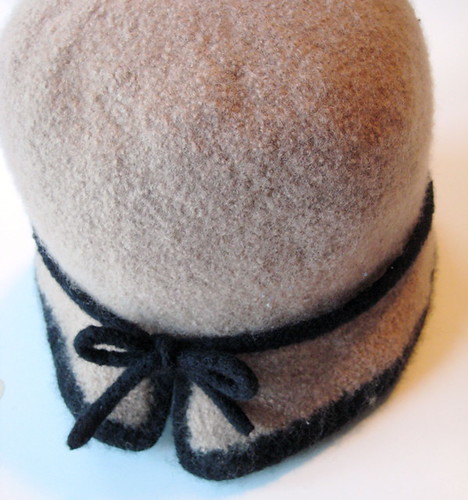
begin with the contrast brim
Using color B, CO 130 st.
Work 5 rows flat in reverse st st (K odd rows, P even rows).
Row 6: Change to color A. K to end.
Row 7: *(K1, P1). Rep from * to end. (This row stops the brim from further rolling)
Rows 8-13: Cont in st st (K even rows, P odd rows)
Row 14 (dec row): K10, K2tog, K to last 12 st, SSK, K10 (2 st dec).
Row 15: Purl.
Dec 2 st on every RS row in this manner until 10 st have been dec (120 st rem). Purl all even rows.
join the slit & knit in the round
Next RS row: K10, K2tog, K to last 12 st, SSK, K to end. CO 2 st using the backwards loop method, place marker, and join to knit in round (120 st rem).
You will knit this hat in the round from here onwards. Cont knitting in st st until hat measures 11.5 inches from the brim.
crown
Next row: *(K10, place marker). Rep from * to end. You will have placed 11 markers, evenly spaced throughout the hat, for a total of 12 markers -- make sure that they are a different color from the marker that you used to mark the start of the rounds.
Next row (dec row): *(K2tog, K to next M, slip M). Rep from * to end. 12 st dec (108 st rem).
Next row: Knit.
Cont in this manner, dec 12 st on every other row, until 12 st rem. Remove all M.
Next dec row: K2 tog to end (6 st rem).
Cut a 6-inch tail of yarn, thread through rem st and pull snug. Bring tail through to inside of hat, knot securely and weave in end.
contrast edging on slit
With RS facing and using color B, pick up and knit 17 st up the left selvedge, pick up and knit the 2 cast on st, and then pick up 17 st down the right selvedge.
Row 1 (WS): P16, P2tog, P2tog, P16.
Row 2 (RS): K15, K2tog, SSK, K15.
Row 3 (WS): P14, P2tog, P2tog, P14.
Row 4 (RS): BO 13 st, cont to BO as you K2tog, SSK, BO to end.
Weave in and trim all ends.
hat band (optional)
Using color B and DPN's, CO 4 st.
Knit an I-cord about 40 inches long.
Tie off, trim ends.
flower (optional)
Using color B and circular needle, CO 20 st.
Row 1 and all odd rows: Purl
Row 2: Kfb every stitch (40 st)
Row 4: Kfb every stitch (80 st)
Row 6: Kfb every stitch (160 st)
Row 7: BO, leaving an 8-inch tail.
Coil the work into a rosette. Using the yarn tail and a tapestry needle, sew into place. Weave in ends.
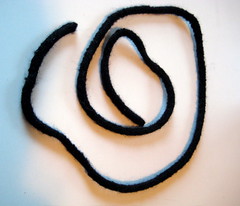
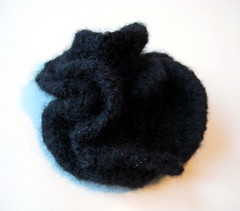
hat band; rosette -- um, not to scale
felting
(Find basic felting instructions here)
Place the hat band and rosette into a zippered garment bag, and place the hat into a separate pillowcase and tie shut. Felt (along with additional items for agitation) for one or two ten-minute cycles in your washer. Check all the items to see how they are progressing. You will probably want to remove the hat band and flower after the first or second cycle. The hat may need additional cycles until it fits snugly.
Try the hat on after each cycle until it reaches desired snugness. While wearing hat, smooth the crown completely. Tug and stretch the brim until the whole hat is nicely shaped with a smooth crown and flared brim. Stuff with plastic bags and place over a vase or other item to dry in shape.
Tug, stretch and smooth the rosette and hat band into shape and allow to dry.

drying on top of a vase
finishing
Once all the items are completely dry, it's time to trim your hat. Sew a pinback onto the rosette. Pin onto hat if desired.
Put on your hat, and then tie the hat band into place. You may tie a bow, overhand knot, or other decorative knot as desired. Sew or gently needle-felt the hat band into place if desired -- but please remove your hat first to avoid injury. Ouch!
Put on your sack dress and fishnets, and have a great time dancing at the local speakeasy in your new hat!
important notice: This is a free pattern and you are welcome to use it for all the non-commercial purposes you like. However, you may not reproduce this pattern to sell, and you may not sell what you make with it. You may donate what you make with it to charity, and you may use it for charity fundraisers only if 100% of the proceeds are donated to the charity (and by charity I don't mean your kid's college fund). Thanks for understanding!
this is beautiful...thanks for sharing your pattern!
ReplyDeletelaura
Thank you for sharing your pattern, this is beautiful - I've been looking for a good pattern for a cloche!
ReplyDeleteERRATA: if you printed out this pattern before feb 3 2008, the gauge is incorrect. the correct gauge is now included in the pattern -- sorry for hitting 'post' before the final proofread!!
ReplyDeleteLove the hat, wish my head was a good one for hats! Thanks for the compliment on my new granddaughter. I'm always amazed that people actually read my blog. Susan
ReplyDeleteWow, what a great pattern, thank you for writing it up and sharing! I love the classic colors as well.
ReplyDeletefreakin beautiful hat! so grown up and hip at the same time! love it!!
ReplyDeleteCUTE hat!
ReplyDeletewow, it came out perfectly! such cute photo with kitty too.
ReplyDeletebeautiful!! i love the shape and the color... and i bet it's wonderfully warm too. thank you for the pattern! xox
ReplyDeleteDoes the free knitting pattern come with a free kitty?
ReplyDeleteI saw this on Craftzine this morning and love it! I'm including it in today's Daily DIY.
ReplyDeleteSuch a cute hat. I'm not a knitter, so I'll have to bribe my brother to make one for me. :)
ReplyDeleteThis is great! I do not knit, but I do, however, crochet....would you (or anyone out there) be able to figure out the crochet equivalent??? I absolutely adore this hat!
ReplyDeletehelp! i've been working on your hat, which i totally love, but I'm stuck at one point. is it 11.5" from the bottom of the brim or the top? thanks so much!!
ReplyDeletehey anonymous: it's 11.5" from the bottom of the brim.
ReplyDeletegood luck!
Help! My decrease count does not equal your decrease count! The instructions say to K11, PM around, for 12 total sections of decreases. But 11x12 is 132, and my hat-body count is 120! Did you mean K10, PM around?
ReplyDeleteHey Julia C: I think you have discovered an error in the pattern. 11 x 12 does in fact equal 132. It should say K10, PM around, for 12 total sections of decreases. Thanks for finding that error and pointing it out! I will post a correction soon.
ReplyDeleteI just found this looking around for a good pattern for this type of hat. My sister and I think this is just lovely and I can't wait to get knitting. I can't get the wool you used particularly easily and am nervous about using anything else since I've not tried this sort of thing before: could I just use merino wool? Is it important to get the dk weight (not normally knitted on 5mm needles)? You sound like a felting expert so thought I'd best ask! I realise you posted this a long time ago so hope you are still responding to comments. Thanks in advance, and keep making beautiful things!
ReplyDeleteHi Eleanor-
ReplyDeleteI'd suggest asking at your local yarn shop for the most similar merino yarn they have. I'm definitely no felting expert, but this pattern is pretty forgiving, so you will be OK substituting another similar merino yarn, even if the felting is slightly different - just keep on felting until it fits!
Thanks f.pea, I'll let you know how I get on!
ReplyDeletebonjour
ReplyDeletesuperbe
mais une petite question
pourquoi tout les modeles qui me plaisent sont ils en anglais et moi nul comprend pas
bon courage
sylvie
breizh22110@hotmail.com
merci
Help! The pattern says...
ReplyDeleteRow 14 (dec row): K10, K2tog, K to last 12 st, SSK, K10 (2 st dec).
Row 15: Purl.
Dec 2 st on every RS row in this manner until 10 st have been dec (120 st rem). Purl all even rows.
Stupid computer cut off my comment....
ReplyDeleteThe rest of it was, if the decrease rows are the even rows, how do I purl the even rows? Is there something I'm missing or not understanding? Thanks so much--I'm making this hat for my mom for her birthday, and I really want to finish it!
Happy knitting!
vanjula:
ReplyDeleteno worries. this is a really forgiving pattern. just decrease on the right-side rows and purl on the wrong-side rows. you may have to skip a decrease round to make it work, but it will work out fine. good luck!
What a beautiful hat. I even understand most of the instructions. But what does SSK stand for?
ReplyDeletelottyro: Here's a link to standard knitting abbreviations: http://www.yarnstandards.com/knit.html
ReplyDeleteI love this pattern! I ordered the yarn and I really hope it comes in soon!! The hat is too cute and exactly what I've been looking for.
ReplyDeleteI loved this pattern and made one in pink for my daughter. I then cast one on in royal blue for myself. They are both edged in black. Thanks for a great pattern.
ReplyDeletethe first instruction says to do reverse stockinette, knit odd rows purl even rows, but isn't that just stockinette stitch? then row 8 says to switch to stockinette stitch but it says to knit even rows and purl odd rows, but that is reverse stockinette. Please call (513)238-1928. My name is Sally and I am teaching a class at Knit On! In Kentucky, and would love to hear from you.
ReplyDeletethanks!
Sally: even rows are the "right side." This just makes the brim edge roll up nicely for you.
ReplyDeleteare the brim and hat body both supposed to be in stockinette? or is one supposed to be in reverse stockinette? the way the pattern is marked it looks like you switch from reverse stockinette on the brim to stockinette on the body.
ReplyDeletesally: that's correct, the brim is reverse stockinette and the body is stockinette.
ReplyDeleteJulie from Kansas...I'm at 5 inches so far after 6 hours of knitting....wew...hope it gets faster,...thats a lot of knitting....But can't wait to felt for the first time!!! what a cute hat, grandma and neices are getting one for christmas!
ReplyDeletePerhaps in this pattern even rows are right side and vice versa...?
ReplyDeleteI love the hat but can I use Patons Classic Wool?
ReplyDeletemargaret: I think so... it is a plied merino wool, like the one I used, but it is somewhat heavier weight, so do take some time to knit a gauge swatch.
ReplyDeleteWhy isn't the trim on the selvedge edge also worked in reverse stockinette just like the brim
ReplyDeleteLinda: Feel free to knit in reverse stockinette if you like. I found that tiny section of trim behaved just fine in stockinette - particularly because you are going to felt the everlasting heck out of this hat after you're done knitting it anyway!
ReplyDeleteI will trust your pattern and do it your way! It is almost ready to felt! It will be a perfect cloche to wear in my 1929 Model A Ford!!
ReplyDeleteI love the hat and made it for my sister, she loves it! But it took me quite a while and I don't have much time now since I've got a toddler and newborn. Anyway, I. Have a lot of bulky wool yarn and wanted to use that for the hat pattern, but I have no idea how to use my bulky yarn with this pattern. Can you help me?
ReplyDeleteKathryntyndall@aol.com
Thank you for the pattern! I've finished the hat and am now working on the edging for the slit. I'm a bit confused about the "pick up 17" part, since there are more. I did hear you're supposed to pick up only three of four stitches from the side on stockinette, since the stitches aren't square. Is that why? Also... I am picking up the white stitches AND the black ones at the bottom, right? So there isn't a notch out of the corner. Sorry- I'm probably confusing you as much as I am confusing myself. I'd appreciate any pointers you can give me.
ReplyDeleteBriana, you're right about picking up only 3/4 of the stitches. I should have been more explicit. I'm not sure what you mean about picking up white stitches and black ones.You should be working with the contrast color yarn, and picking up stitches from the edge of the hat, which was knit in the main color. I hope that helps!
ReplyDelete