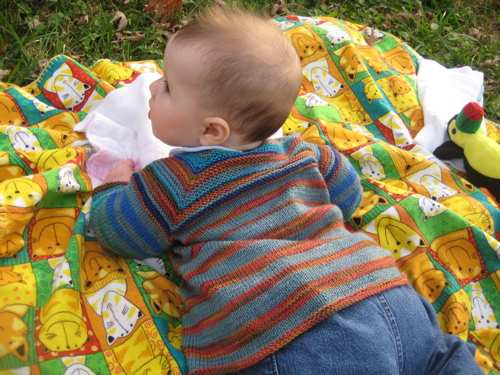
This baby jacket is a great way to use up leftover sock yarn and make a fun little sweater at the same time. This pattern uses three different leftover yarns – one is a solid, one is variegated, and one is self-striping. You can mix yours up however you like. I also varied the width of my stripes as I knitted – make yours as varied or as regular as you like (you don’t have to follow the charts provided below). You can hardly go wrong! Just make sure that your sock yarns are all the same weight and fiber content (more or less). Using superwash yarn is a good idea to keep this little garment easy-care.
[Revised 2.25.09 to add one increase row to body]
materials
leftover sock yarn in 3 colors
color A (solid) – up to 200 yd (shown: Tess Super Sock & Baby)
color B (self-striping) – up to 50 yd (shown: Regia Kaffe Fassett Landscape in color “Caribbean”)
color C (variegated) – up to 50 yd (shown: Lorna’s Laces Shepherd Sock Multi in color “Gold Hill”)
size 2 /3.0mm needles (circular and DPN)
size 1 /2.5mm needles (circular)
size 1 crochet hook (2.35 mm)
2 buttons (3/4 inch)
sewing needle & thread
tapestry needle
gauge: 7 stitches and 9 rows / inch
size: 0-6 (6-12, 12-18, 24) months
finished measurements:
chest circumference: 18.5 (19, 20.5, 21.5) inches
back waist length: 10 (11, 11.5, 12) inches
sleeve: 6.5 (7.5, 8, 8.5) inches
stripe patterns
(as shown in photos – make yours however you like!)
color key:

yoke stripes:

body stripes:
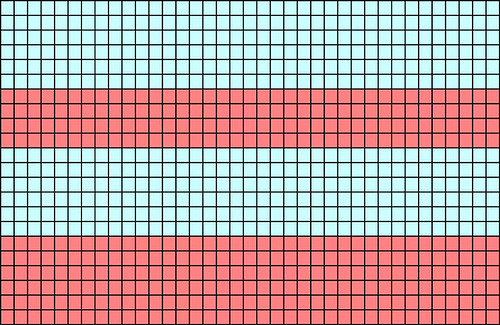
sleeve stripes:

knitting instructions
Using larger needles and color A, CO 2 (3, 3, 4), PM, CO 16 (17, 17, 18), PM, CO 24 (28, 30, 32), PM, CO 16 (17, 17, 18), PM, CO 2 (3, 3, 4).
You will have cast on a total of 60 (68, 70, 76) st.
Row 1: Kfb of first stitch, * K to 1 st before marker, Kfb, slip marker, Kfb. Repeat from * to final stitch. Kfb of final stitch. (10 st inc.)
Row 2: Knit across.
Repeat these last 2 rows until you have 34 (38, 40, 44) st between the back markers.
Next row: *K to 1 st before marker, Kfb, slip marker, Kfb. Repeat from * to final stitch. CO 1 (2, 3, 1) stitches to tip of needle.
Next row: Knit across. CO 1 (2, 3, 1) stitches to tip of needle. You will have 120 (130, 134, 146) st total.
Next row: Work as for previous increase row, without adding the cast on to the end. (8 stitches inc.)
Next row: Knit across.
Repeat these last 2 rows until you have 60 (62, 66, 70) st between the back markers.
divide for sleeves
K to first marker, remove marker, place shoulder st on a length of scrap yarn.
CO 6 (7, 7, 7) st to tip of needle, remove next marker, join to back stitches.
K to next marker, remove marker, place shoulder st on a length of scrap yarn.
CO 6 (7, 7, 7) st to tip of needle, remove next marker, join to remaining front stitches.
K to end.
Complete your color repeat in garter stitch.
Change to color A and stockinette stitch, knitting the body in varying stripes of colors A and C until the body measures 9.75 (10.75, 11.25, 11.75) inches. Change to color C and knit 4 rows in garter stitch. BO.
sleeves
Place the held stitches onto your DPN’s. Using the correct color to maintain your color repeat from the body stitches, pick up and knit the 6 (7, 7, 7) armpit stitches you cast on when dividing for sleeves. Place marker.
You will complete your color repeat in garter stitch, just as you did for the body. This time, when you change to stockinette stitch, you’ll be knitting in alternating rows of colors A and B, starting with color A.
At the same time:
K 3 rows.
Decrease row: K1, SSK, K to last 3 stitches, K2tog, K1. (2 st dec).
Next three rows: Knit.
Continue in this manner, decreasing 2 stitches on every fourth round until 40 (42, 44, 48) stitches remain. Do not decrease any further.
Knit until sleeve measures 6.25 (7.25, 7.75, 8.25) inches.
Change to color C, K 4 rows in garter stitch. BO loosely.
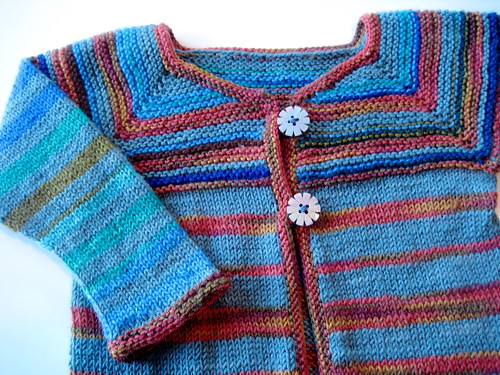
button bands
Using smaller needles and color C, pick up 3 out of every 4 stitches along the right front selvedge (about 70, 78, 82, 86 stitches).
Knit 3 more rows in garter stitch. BO.
Repeat for left side.
collar
Starting at the right front, using color C and smaller needles, pick up and knit the collar stitches.
Pick up and knit 14 (16, 17, 18) stitches from the right front, 16 (17, 17, 18) stitches from the right shoulder, 24 (28, 30, 32) stitches across the back, 16 (17, 17, 18) stitches from the left shoulder, and 14 (16, 17, 18) stitches from the left front.
Turn work, K 3 more rows in garter stitch.
Final row: K2tog, bind off all stitches until 2 st rem, SSK, BO.
buttons
Sew first button onto right side of button band, 1/2 inch down from neck line. Sew second button 2 inches below first button (measuring from centers of buttons).
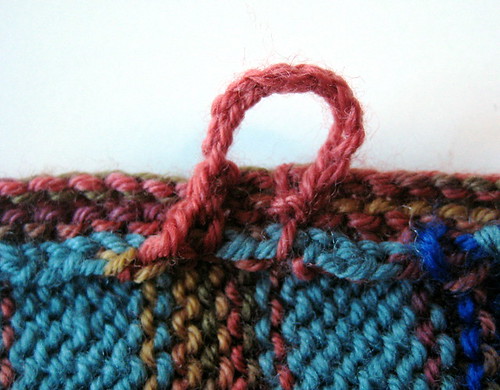
button loops
Using crochet hook and color C, attach the yarn to the left button band on the wrong side of the sweater, being sure to place the loop where it will line up with the first button.
Make a chain of 11 ch with your crochet hook (or the proper length to fit your button). Attach chain to back side of button band, secure and weave in ends.
Repeat for the second loop, lining up with the second button.
finishing
Weave in loose ends. Block sweater into shape.
important notice: This is a free pattern and you are welcome to use it for all the non-commercial purposes you like. However, you may not reproduce this pattern to sell, and you may not sell what you make with it. You may donate what you make with it to charity, and you may use it for charity fundraisers only if 100% of the proceeds are donated to the charity (and by charity I don't mean your kid's college fund). Thanks for understanding!
This is lovely, thank you for sharing the pattern. And congratulations on your baby pea. I found my way over here after looking at some of your patterns and projects on ravelry and am enjoying your blog.
ReplyDeleteI should knit one of these up quick while my daughter is still 2 ;)
Then I'll just need to knit myself lots of socks (since most of my handknit ones have holes in by now) to build a nice collection of scraps!!!
Very nice cardi! and good timing too - I've been planning making one (again) for my youngest one (1yr 2months) as she has grown out of her latest cardi, and this fits the bill perfectly! (also - I have a huge stash, so no need to buy new yarn for it either.) Like your design very much.
ReplyDeleteWonderful!
ReplyDeleteKisses
Beautiful!
ReplyDeletePerfect timing for me too-- I've been looking for a baby sweater pattern using sock yarn. I'm due in July!
ReplyDelete-Kelly W
Beautiful sweater. Thanks for sharing the pattern.
ReplyDeleteThanks for sharing, beautiful baby sweater.
ReplyDeleteVery nice way to use up leftover sock yarn.
ReplyDeletePerfect, as I've just started knitting socks (3 pairs already) and I have a granddaughter who is nearly 2!
ReplyDeleteThis is adorable - thank you for the pattern! I love the colors that you've chosen.
ReplyDeletefound my way over here from ravelry - what a great pattern! unfortunately - or maybe fortunately! - i need something new on my needles and this could be it!
ReplyDeleteA beautiful pattern. I wish I had more sock yarn in my stash... I may just have to go buy some to have leftovers.
ReplyDeletethis is the best way to use up leftover sock yarn that i have ever seen! adorable.
ReplyDeletexo
Love this pattern! I've a new granddaughter on the way. I'll have to get this cast on soon! Thanks,
ReplyDeleteThanks for lovely easy pattern - have just made a little baby cardi from this pattern - looks really cute.
ReplyDeleteThanks again.
Shirley I.
what method cast on do youuse when dividing for the sleeves
ReplyDeleteSue: I use the backwards loop method, but you can use whatever method works best for you.
ReplyDeleteHi, I just made this lovely cardigan out of sock yarn for my baby niece, and I posted a pic here http://dotsorstripes.blogspot.com/2010/04/choc-cherry-baby.html. Thanks so much for this pattern - it's fun to knit and looks simply fabulous!
ReplyDeleteThis is perfect. Just what I need. I wanted to make a sweater for my new granddaughter, who is due any minute, but in the 4ply area of my stash I could only find single or partial singular balls of left-overs from making sweaters for my daughters when they were young. I knew fair-isle was a possibility, but thought it would not really suit a tiny baby. Their fingers would get stuck in the strands, and it would be too heavy.
ReplyDeleteThanks again for another sweet baby cardigan. Great instructions. Mine are for charity, as my granddaughters are all too big now.
ReplyDeleteHello F. Pea -- I'd really like to get in touch and ask you a question, but I can't find an e-mail address here. Can you contact me maybe? anna.braw[at]libris.se
ReplyDeleteBeautiful cardigans! I'm very impressed!
Greetings from Sweden,
Anna
I made this for my youngest daughter but now she has outgrown your sizing and I can't find anything quite like it. Your sizes don't follow a consistent amount of stitches larger per size so I cannot even make it up! Can you pretty please make larger sizes available?! She's in a 4T now! ;)
ReplyDeleteHi Cambria. Sizing up is something you can do for yourself! Size is not about the number of stitches, but about the measurement of the finished piece and the person you're trying to fit. Take a tape measurer and measure around your daughter's chest at the widest part. Add about 2 inches of ease, and that's the target you're shooting for. Measure her arms from the armpit to the wrist, and you have sleeve length. As you knit, try it on her to see if it's long enough. Getting the right size is all about being flexible and making it fit the person it's intended for - no matter what the pattern says! I am working on a how-to post about sizing any pattern to fit, so keep an eye out for that! Happy knitting!
DeleteI am in the process of knitting this lovely cardigan but just wanted to ask do you take the measurement for the body from the shoulders or from the start of the stocking stitch? Also I added the extra increase row before dividing for the sleeves - was this incorrect.
ReplyDeleteThank you
Sincere thanks for this lovely pattern. I've knitted it many times as it makes a great gift for a new baby. I also like it because its good for knitting while travelling. It's challenging enough to be interesting but manageable under most circumstances.
ReplyDelete