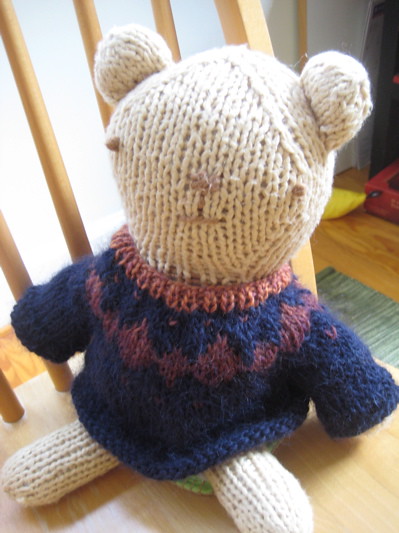
Poor bear. He was a bit chilly in July, stuck inside with the air conditioning on all the time. Some scrap yarn from the stash fixed him right up with a toasty new sweater.
If you've been wanting to try your hand at fair isle, or learn to knit a sweater in the round from the bottom up, here's a quickie to get you started! The sweater is knit in the round on circular needles, starting at the bottom edge and working up to the underarms. Then the sweater goes on hold while you knit each sleeve, bottom up. All three are joined together and worked as one piece in the round, with the fair isle design in the yoke. Once you've cast off the neck, the only finishing left to do is to graft the underarm stitches together. A one-day sweater -- and a happy kid with a freshly-outfitted bear.
materials
About 75 yards of worsted weight wool in the main color(I used Classic Elite Montera)
About 25 yards of worsted weight wool for the contrast color (I used Wisdom Yarns Poems)
16 inch circular needles, US size 8
double-pointed needles in US sizes 8 and 6
tapestry needle
stitch markers
gauge
4 inches = 18 stitches / 20 rows
size
One size. Feel free to lengthen or shorten as needed. The bear for which this sweater was knit is 15 inches tall (including legs) and has a 13 inch chest circumference.
measurements
circumference = 16 inches
length = 4.5 inches
sleeve length (from underarm): 2.75 inches
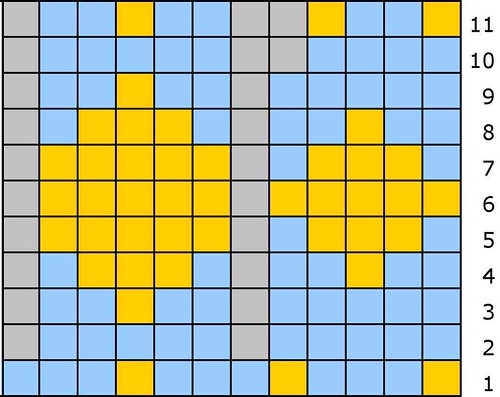
color chart
body
Using the circular needles, cast on 72 stitches. Place a marker and join to knit in the round.
Knit three rounds.
Round 4: *K1, P1. Repeat from * to end.
Round 5: Knit.
Continue knitting in stockinette stitch until sweater measures 2.5 inches from the bottom edge.
Next row, decrease 2 stitches evenly.
Next row, work row 1 of the color chart. Then leave your work on the needles and knit the sleeves.
sleeves
Using the larger double-pointed needles, cast on 24 stitches. Place marker, distribute the stitches evenly over three needles, and join to knit in the round.
Knit three rounds.
R4: *K1, P1. Repeat from * to end.
R5: Knit.
Continue knitting in stockinette stitch until sleeve measures 2.5 inches from the bottom edge.
Next row, work row 1 of the color chart. Then place your stitches on a piece of scrap yarn.
Work the second sleeve.
join the body to the sleeves
Return to the body of the sweater. You will be working the color chart, completing a decrease round, and joining the sleeves to the body, ALL AT THE SAME TIME. Ready?
Begin row 2 of the color chart. *(K4, K2tog) 5 times across the front of the sweater. You will have 25 stitches in this section.
Using the tapestry needle, place the next 5 body stitches of the sweater on a piece of scrap yarn.
Now join your working yarn to the sleeve, and knit around the sleeve while decreasing: *(K4, K2tog) 3 times around the sleeve. Put the remaining 5 sleeve stitches on a piece of scrap yarn.
Join the working yarn to the back section of the sweater (the next live stitches in line after the ones you first put on scrap yarn). Continue by working *(K4, K2tog) 5 times across the back of the sweater. You will have 25 stitches in this section. Put the last 5 body stitches onto a piece of scrap yarn.
Now join the working yarn to the second sleeve, just as you did before. *(K4, K2tog) 3 times around the sleeve. Put the remaining 5 sleeve stitches on a piece of scrap yarn. You should have 100 stitches on your needles.
Now you're back at the stitch marker and ready to begin round 3 of your color chart.
Work the next 6 rounds of the color chart. On the next round (the one that's all made up of the main color), decrease again.
Decrease round: K4, *(K8, K2tog) 10 times. K4. 90 stitches remain on your needles.
Work the final row of the color chart.
Knit one more round in the main color, decreasing again as you go: *(K7, K2tog). 80 stitches remain.
Change to contrast color and smaller double-pointed needles.
Knit one round in the contrast color, decreasing as you go: *(K6, K2tog). 70 stitches remain on your needles.
Next two rounds: *(K1, P1). Repeat from * to end.
Cast off loosely, maintaining the K1, P1 ribbing.
finishing
Use kitchener stitch to weave underarms together.
Weave in loose ends.
non-commercial bit: These are free patterns and you are welcome to use them for all the non-commercial purposes you like. However, you may not reproduce the patterns to sell, and you may not sell what you make with them. You may donate what you make with them to charity, and you may use them for charity fundraisers only if 100% of the proceeds are donated to the charity (and by charity I don't mean your kid's college fund). Thanks for understanding!
Adorable.
ReplyDeleteThat is very cute! Thanks for the pattern.
ReplyDeletei can't even
ReplyDeletethink about sweaters now.
maybe in the fall.
it's super cute
though!
xo
Que lindo!! adorei o ursinho:))
ReplyDeletebjinhos
My five year old son saw this little bear and really wants me to make it for him. Did you happen to make the bear, too? And if so, could you let me know which pattern you used?
ReplyDeleteBTW... thanks for posting the sweater. I have been so scared to make one for fear of spending a lot of time, money and energy on something that will fail miserably in the end. This little bear sweater is just the perfect size... and I am thrilled to try the fair isle, too.
Take care and keep up the good work. I really enjoy your blog.
Oh my. That is so, so cute! I think the name is my favorite part. =) Thanks so much for this, I'll be linking.
ReplyDeletewhat a sweet little bear! he reminds me of a much-loved little kitty that belongs to my big sister. lily kitty is now approaching 58 years of age and spends most of her time carefully wrapped in a soft cotton blanket, but my sister brought her out for a little visit when I was staying with her recently. :)
ReplyDeleteThe bear itself is from Jess Hutch's book, "Unusual Toys for you to Knit and Enjoy"
ReplyDelete