
My grandmother liked to make dolls for us from hollyhock flowers: one bud for the head, one bloom for the skirt. Dolls are easy to make from whatever you have on hand, and fortunately children are easy to please when it comes to a new toy. This sweet felted doll is no different - she is made from leftovers and stashed bits. Find a handful of worsted-weight wool leftovers and you're ready to make a snuggly felted doll for your little one. Doll’s dress & sweater patterns from scrap sock yarn coming soon.
The doll is knitted all in one piece, from the top down, with minimal sewing up, and then felted. Her head and hands are made from less than half a skein of one skin-toned color, and her top and leggings from similar amounts in two different colors of your choice (you could also make a bodysuit in one solid color if you like). After felting, stuffing and sewing up, you'll make her hair and embroider her face. I made her hair from a small amount of heavy worsted merino, but almost any yarn can work for the hair, from Fun Fur to silk. Once you've embroidered her face, she's finished. Then you can make endless outfits from her with more of your leftover yarn - dolls just love new outfits.
and here's a dress for your doll.
size: one size
measurements
head-to-toe length: approximately 10 1/2 inches
head circumference: 10 inches
chest circumference: 8 inches
gauge
about 4.5 stitches = 1 inch. Gauge is not terribly important for this project.
materials
less than 1/2 skein of worsted-weight 100% wool in each of three colors:
color A (skin tone)
color B (top)
color C (leggings)
I used Cascade 220 – whatever you use, be sure that it will felt!
size 8 (US) double-pointed needles
stitch markers in at least 2 colors
less than 1/2 skein of yarn for hair
embroidery floss for eyes and mouth
embroidery needle
tapestry needle
sewing needle & thread in color to match hair
small amount of polyester fiberfill (or stuffing of your choice)
sewing machine (optional)
knit the doll’s head (starting from the crown)
Using Color A, CO 6, distribute evenly across 3 DPN’s. Place marker and join to K in the round, being careful not to twist.
Round 1: K1fb into every stitch. 6 st increased.
Round 2 (and all even rounds): Knit.
Round 3: *K1, Kfb. Repeat from * to end. 6 st increased.
Round 5: *K2, Kfb. Repeat from * to end.
Round 7: *K3, Kfb. Repeat from * to end.
Continue in this manner, increasing 6 stitches on every odd-numbered round, until you have 60 stitches on your needles.
Knit 9 rows even (without increasing).
Decrease round 1: [K8, SSK] 3 times. [K8, K2tog] 3 times. 6 st decreased.
Round 2 (and all even rounds): Knit.
Decrease round 3: [K7, SSK] 3 times. [K7, K2tog] 3 times.
Decrease round 5: [K6, SSK] 3 times. [K6, K2tog] 3 times.
Continue in this manner, decreasing 6 stitches on every odd-numbered round, until you have 24 stitches remaining on your needles.
Knit 8 rows even for the neck
body
If you have ever knitted a sweater from the top down, this section is going to feel very familiar (and if you haven’t – perhaps you should try it!)
Round 1: K8, place marker, change to Color B, K4, place marker, K8, place marker, K4 to end.
Round 2: * Kfb, K to 1 st before next marker, Kfb, slip marker. Repeat from * to end. 8 stitches increased.
Round 3 (and all odd-numbered rounds): Knit.
Round 4: Repeat round 2. 8 stitches increased.
Continue in this manner, increasing 8 stitches on every even-numbered round, until you have 16 stitches between the back two markers (that is, in the largest section).
divide for arms
Without increasing any more, knit across to the first marker, remove the marker, and place the next 12 stitches on a piece of scrap yarn – this will become the doll’s left arm.
Remove the next marker. Using the backwards loop method, cast on 2 stitches to your needle and join to knit across the back 16 stitches. Remove the next marker, and place the next 12 stitches on a piece of scrap yarn to create the dolls’ right arm. Remove the next marker. CO 2 stitches again, join to the remaining stitches and knit to the final marker (leave this marker in place to mark the start of your rounds).
Now you will simply knit the torso in the round, continuing in st st until the torso measures about 3 inches.
leggings
Next round: Change to Color C. Knit 1 round in the new color.
Now we’re going to use some short rows to give the doll some booty:
K 20. Place a marker. K 14. Place a marker. Wrap the next stitch and turn your work. Purl back to the first marker. Wrap & turn.
K to 1 st before marker. Wrap & turn.
P to 1 st before marker. Wrap & turn.
K to 2 st before marker. Wrap & turn.
P to 2 st before marker. Wrap & turn.
Knit across this row, knitting the wraps together with their stitches as you go and removing all the markers. Continue knitting to the end of this round. Now your doll has a cute little heiney.
divide for legs
Next round: *K 4, K2tog. Repeat from * to end. 6 st decreased. 30 stitches remain on your needles.
Next round: K 5, bind off 3. Using a new needle, K 12. Bind off 3. Place a new marker and join to knit the next 12 stitches in the round as one leg, leaving the remaining 18 stitches behind on a stitch holder or a piece of scrap yarn.
Continue in st st until leg measures 3 inches.
Next round: Decrease 3 st evenly. 9 st remain.
Knit 4 rounds even.
make a foot
This will feel very familiar if you’ve ever made a sock.
Knit across 7 stitches. Turn your work.
Slip one, P2, turn.
Slip one, K2, turn.
Slip one, P2, turn.
Slip one, K2.
Pick up and knit 2 stitches down the selvedge of the heel flap you’ve just made. Place a marker. Knit 6. Place a marker. (Be sure to remove the original marker that marked the start of the round – it’s just in the way now).
Pick up and knit 2 stitches up the other selvedge of the heel flap.
K 3, K2tog. Slip marker, SSK. K2, K2tog. Slip marker, SSK. 9 stitches remain.
Knit 5 rounds even.
Next round: K2tog 4 times. K1. 5 st remain.
Cut the yarn, leaving about a 6-inch tail. Pull the end through the remaining 5 stitches, securing the yarn end inside the foot and weaving in a bit before you trim it.
second leg
Rejoin your yarn to the held stitches, and knit the 12 held stitches. Place a marker and join to knit in the round. Make this leg just as you did the first one, all the way to where the heel starts.
second foot
To begin this heel, Knit across 4 stitches, turn your work. Now continue exactly as you did for the first foot. Complete as before.
arms
Go back to the shoulder and place the held stitches from one of the arms onto your needles, removing the scrap yarn. Join your yarn (Color B) and knit the 12 held stitches. Pick up and knit the 2 armpit stitches from the torso, and place a marker to mark the start of the round.
Knit 3 rounds even.
Next round: Decrease 2 st evenly. 12 st remain.
Knit 1 round.
Next round: Decrease 2 st evenly. 10 st remain.
Knit 2 more rounds in Color B.
Change to Color A. Knit 4 rounds.
hand
Increase round 1: * K1, Kfb. Repeat from * to end. 5 st increased.
Knit 5 rounds even.
Next round: K2, K2tog. K to 2 st before marker, K2tog. Slip marker. Leave the next 2 stitches on a holder to make the thumb. Join your needle to the third stitch, and continue knitting these 11 stitches in the round.
Knit 3 more rounds.
Next round: [K1, K2tog] 5 times. 6 st remain.
Next round: K1, K2tog, K2tog, K1. 4 st remain.
Cut the yarn, leaving about a 6-inch tail. Pull the end through the remaining 4 stitches, securing the yarn end inside the hand and weaving in a bit before you trim it.
To make the thumb, rejoin your yarn to the 2 held stitches and knit a two-stitch I-cord for 4 rows. Break your yarn and pull the tail through these two stitches to secure them.
Repeat this whole process for the second arm.

finishing & felting
Once you’ve finished knitting your doll, go back to weave in ends and trim them up. You’ll have a big gap in the doll’s crotch for stuffing.
Carefully felt the doll to size. Need help felting? Here's a great tutorial.
Once she’s ready, stuff her very firmly with plastic bags. Push, pull and tug her into shape – don’t be too shy. Felted fiber is tough stuff, and the shape she dries in will be the final shape you get, so make her look just the way you want her to.
Allow the doll to dry for a couple of days. Once dry, remove the plastic bags and stuff more gently with polyester fiberfill (or your stuffing of choice). I like to stuff the head, hands and feet rather firmly, and the arms, legs and torso more softly. I am careful to stuff the joints (shoulder and hip) only lightly, to allow her to bend and sit. Stuff to the firmness that you prefer. Once you’re done, use your Color C yarn to sew up the stuffing hole.
hair
There are as many ways to make hair for a doll as there are home-made dolls. You can make yours however you like.
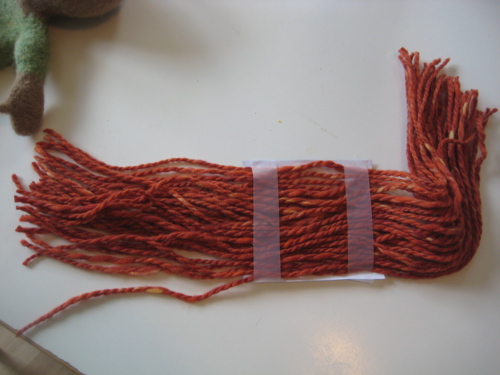
I made my doll’s hair by sewing the yarn down to a piece of paper, removing the paper and then tacking the hair into place on the doll (I thought it was kind of ingenious until I discovered that plenty of other people already did it this way). Here’s a great step-by-step tutorial from the Crafty Sheep.
Instead of using yarn to sew the hair into place, I sewed my doll’s hair along the scalp line with matching sewing thread. Then I neatly gathered the doll’s hair into a ponytail on each side, and secured those in place with sewing thread as well. Finally, I braided the hair, tied a piece of yarn to finish the braid, and trimmed to my desired length. Style your doll’s hair however you like! To make wavy or kinky hair, use yarn that has been unraveled from another knitted item.

here are a few other ways you can make hair:
Make a fringe
Sewn-on loops
Crocheted hair
embroidering the face
Here I’ll just say, I am horrible at embroidery. After unsuccessfully begging my sister to embroider the face for me, I finally sat down with the embroidery floss (two strands) and needle, and dove in. I think it came out OK. I marked the eye and mouth locations with a pencil first, and I think I held my breath the whole time. Good luck.
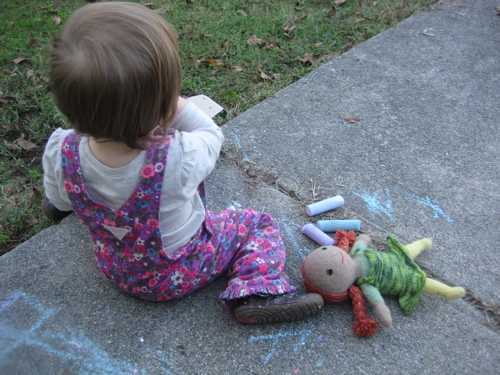
So, now hopefully your doll has a sweet face and is ready to play! Have fun, and don’t forget to make her some clothes! But she looks just as cute in her long johns.
So cute! Thanks for sharing the pattern.
ReplyDeleteSuch a cute pattern! I think the doll's face is fine.
ReplyDeleteHello! I found this favourited on Ravelry and rushed over to check it out. It's such a lovely shaped doll. I am off to "queue" it. Thank you.
ReplyDeleteThis is wonderful! Thank you :-)
ReplyDeletebeautiful!
ReplyDeleteAww, that is super cute! What a fun project. Thanks so much for this, I'll be linking.
ReplyDeleteThanks, It's beautiful
ReplyDeletejust found this in Ravelry favorites. I can't wait to make her for my grandaughter. She is so sweet. SHE HAS THUMBS. how great is that?
ReplyDeleteVery awesome pattern. I have a five and a half year old who still loves dolls and have been looking for an easy way to make my own dolls, ie cloth, crochet/knit dolls. I w/definitely have to try this one.
ReplyDeleteAdorable. I've knit two (different pattern) dolls for my daughter and she loves them. I love seeing more knit dolls.
ReplyDeleteI was also thinking from your opening statement that you night like this pattern for a knit hollyhock doll:
http://www.ravelry.com/patterns/library/hollyhock-doll
Thank you, Mandy! This is rad!
DeleteThanks for linking! I am glad this sock skeleton will be featured in One Pretty Thing!
ReplyDeleteThanks so much for the very sweet Scrappy Doll. And the clothes. Very kind of you to share them with us.
ReplyDelete