Sunday, December 26, 2010

season's greetings

walking downtown

We're snowed in at HWWLLB's parents' house in the mountains. It's wonderful.

It was such a busy, hectic fall. Being snowed in over Christmas means that basically everything has stopped. We didn't travel to see more relatives, I'm not trying to cram in any work, we're not even making trips to the grocery store. We're here with yarn and books and toys, finding little ways to have fun, and taking lots of naps. I really needed this break. It took a foot of snow to get me to slow down and relax!

I have two knitting projects going here: one secret and one decoy. The secret project was supposed to be a Christmas gift, but it wasn't done in time, so it will be a birthday gift in January instead. It's Elizabeth Zimmerman's Norwegian mittens, and they are the most beautiful things I've ever knitted by far. I keep stroking and gazing at them (which may be why they weren't finished in time for Christmas!).

The decoy is because we're hanging out with the mitten recipient, so I can't very well gaze upon the mittens (or knit them) in front of her. So I'm working on a bulky jacket for the Pea with big fat giant colorful Lang Mille Colori Big yarn. It's beautiful and soft and quick and fun.

It's hard to fit all this knitting in between naps and baking, but somehow I'm managing. I hope you're having a wonderful holiday. This is just what I wanted for Christmas!

Monday, December 06, 2010

recipe::warm & spicy winter soup

I am a firm believer in the healing powers of home-made soup. As a vegetarian, I'm always looking for the non-meat version of the incredibly comforting chicken-noodle soup. This isn't that exactly, but it is a warm, aromatic bowl packed full of vitamin C, protein, and immune-system-boosting ingredients for a cold winter's night.

If this soup is for family dinner, serve it with salad and a crusty bread to make it snazzy - but if you're feeling under the weather, a bowl by itself is nutritionally complete and sure to warm your bones. Bonus: this recipe is also vegan and gluten-free!

warm & spicy winter soup

prep time: 20 minutes
cooking time: 1 hour
serves 4-6

ingredients

1 onion, minced
10 cloves garlic, minced
1 2-inch stick of fresh ginger, peeled & minced
2 Tbsp olive oil
1 tsp curry powder
1/2 cup dry mung beans, split peas, lentils or other quick-cooking dry bean
1/2 cup millet or quinoa
1 sweet potato, diced
3 medium carrots, diced
1 bunch of fresh greens (spinach, kale or chard work well), chopped
1 quart of vegetable stock
juice of 1/2 lemon
salt & pepper to taste

Mince the onions, garlic and ginger in the food processor or by hand. In a large soup pot, warm the olive oil over medium heat. Saute the onions, garlic and ginger until the onion becomes tender and translucent, about 5 minutes. Add the curry powder and saute another minute. Pour the vegetable stock into the pot.

Rinse the beans and grains well and add them to the pot. (If you are using quinoa, soak it first and rinse it thoroughly to remove the bitter husk). Bring the pot to a boil, then turn it down to a simmer and cover the pot. Let it simmer for about 30 minutes.

Meanwhile, peel the carrots and sweet potatoes and dice them. Add them to the pot, and continue to simmer, covered, until the vegetables and beans are tender (another 20-30 minutes).

Once the veggies and beans are tender, add the greens, stir them in and let the whole pot simmer until the greens are tender, another 5-6 minutes or so. Salt and pepper to taste. Before serving, add the lemon juice.

tips & variations
- Chopped frozen spinach is a fine substitute for fresh, especially when you're in a hurry.

- If you have some leftover cooked brown rice, you can add that instead of the millet or quinoa. Cooked grains should be added about the same time you add the greens.

- If you like thicker, creamier soup, try this: Just before the point when you'd add the greens, scoop about 1/3 to 1/2 of the pot of soup into the food processor and puree. Return the puree to the pot and stir it in well. Then continue with the rest of the recipe.

- If a little extra heat makes your runny nose feel better, consider adding 1/2 tsp cayenne pepper or hot chili paste to the onion saute along with your curry powder. Serve with a bottle of hot sauce on the table, too.

- I like to make a big batch of soup and then freeze containers of one to two servings for another day. If you do that with this recipe, I'd suggest leaving out the greens and lemon juice. Add them instead when you defrost and re-heat the soup to get a fresher taste, brighter colors and more nutrients out of your leftovers.

I hope this helps you through your winter colds!
Friday, November 26, 2010

free pattern friday::soxxy dress

soxxy dress

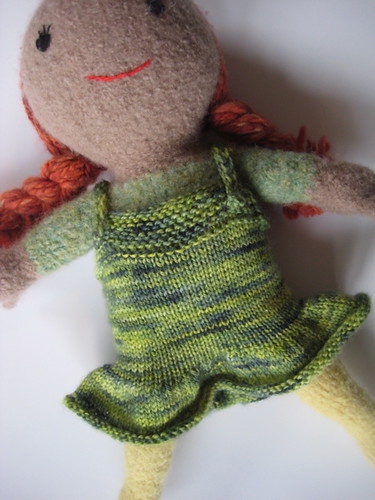
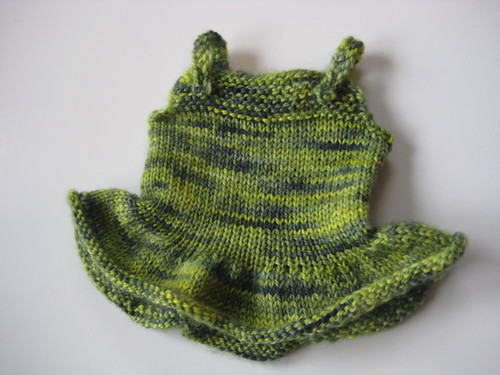
Here's a dress for the Scrappy Doll, made with some sock yarn leftovers. The pattern is knit from the bottom up, and quite simple, so you can adapt it for dolls of all sizes. Make one in each of your favorite sock yarn leftover colors!

size: one size (to fit a 10.5 inch doll)

gauge: 7.5 stitches/inch

materials:
small amount of leftover sock yarn (shown in Curious Creek Wasonga)
US Size 1 DPN's
stitch marker
tapestry needle

Cast on 124 stitches. Join to knit in the round, being careful not to twist. Place a stitch marker to mark the start of the round.

Knit 4 rounds in stockinette stitch.
R5: *K1, P1. Repeat from * to end. This ridge will stop the edge from rolling further.
Continue in stockinette stitch until the piece measures one inch.

Next round: K2tog every stitch to end. 62 stitches remain.
Continue in stockinette stitch until the piece measures 3.5 inches.

Next round: Knit 31, placing all stitches on one needle. Knit the next 31 stitches onto another needle - now your work is divided into 2 pieces.

You will knit flat from here up, working back & forth on one needle only, knitting every row (garter stitch). As you go, be sure to slip the first stitch of each row, with the yarn held in the front (wyif), in order to keep a tidy edge. You can hold your stitches for the front of the dress on a needle, scrap yarn or a stitch holder as you work the back.

soxxy dress 2

back of dress
Row 1: BO 3, K to end.
Row 2: BO 3, K to end.
Knit 4 rows.

Next row: Slip 1 wyif, K2tog, K to 3 stitches before end. SSK, K1.
Next row: Knit.
Repeat these last 2 rows until 21 stitches remain on the needle.

create the straps
Next row: Slip 1 wyif, K2tog, K1, BO 13, K1, SSK, K1.
Now you have 2 straps begun, each with 3 stitches. Hold one on your needle or a piece of scrap yarn while you knit the other. Work 21 rows on each strap, continuing to slip the first stitch of each row wyif. Once you have 21 rows, bind off all stitches, trim the end, rejoin the yarn and work the other strap the same way.

front of dress
Rejoin the yarn.
Row 1: BO 3, K to end.
Row 2: BO 3, K to end.
Knit 4 rows.
BO all stitches.

finishing
Weave in ends and trim. Fold the straps over from back to front and sew them down very firmly on the front of the dress (see photo).

Sunday, November 07, 2010

recently

smooshee3

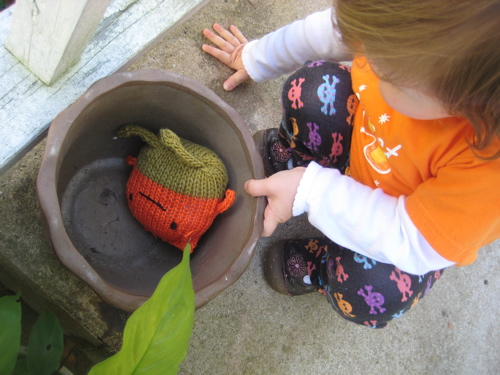
I knitted a smooshee man as a gift for one of the Pea's friends. She enjoyed taking him for a test run in the backyard.

mid stream

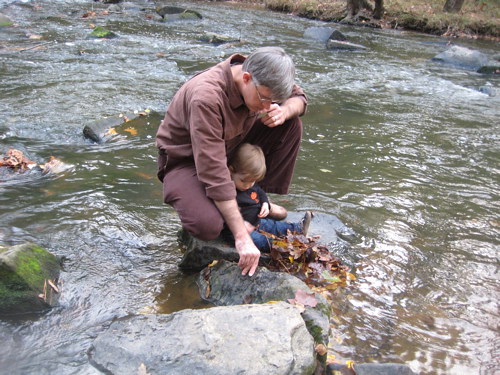
Instead of trick-or-treating, we spent Halloween playing at the state park just outside city limits.

broccoli girl

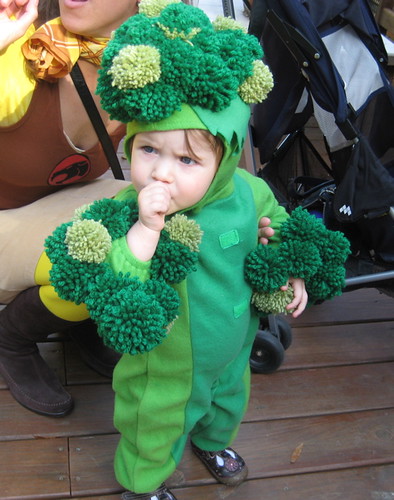
If you guessed that all those pom-poms I made were for a broccoli costume, you were right (and also, you are amazingly psychic!). She liked the costume for about the first 15 minutes, but spent the rest of the afternoon pulling on the pom-poms saying "OFF! OFF!" The broccoli looks a bit steamed in all of the pictures. HA HA! Steamed! Broccoli! Ah, just made myself laugh. Whew.

leaves in stream

I can't believe it's November already. November 7th, to be exact. Holy moly. I hope you're having a great fall.

Friday, October 29, 2010

free pattern friday::scrappy doll

scrappy doll

My grandmother liked to make dolls for us from hollyhock flowers: one bud for the head, one bloom for the skirt. Dolls are easy to make from whatever you have on hand, and fortunately children are easy to please when it comes to a new toy. This sweet felted doll is no different - she is made from leftovers and stashed bits. Find a handful of worsted-weight wool leftovers and you're ready to make a snuggly felted doll for your little one. Doll’s dress & sweater patterns from scrap sock yarn coming soon.

The doll is knitted all in one piece, from the top down, with minimal sewing up, and then felted. Her head and hands are made from less than half a skein of one skin-toned color, and her top and leggings from similar amounts in two different colors of your choice (you could also make a bodysuit in one solid color if you like). After felting, stuffing and sewing up, you'll make her hair and embroider her face. I made her hair from a small amount of heavy worsted merino, but almost any yarn can work for the hair, from Fun Fur to silk. Once you've embroidered her face, she's finished. Then you can make endless outfits from her with more of your leftover yarn - dolls just love new outfits.

and here's a dress for your doll.

size: one size

measurements
head-to-toe length: approximately 10 1/2 inches
head circumference: 10 inches
chest circumference: 8 inches

gauge
about 4.5 stitches = 1 inch. Gauge is not terribly important for this project.

materials
less than 1/2 skein of worsted-weight 100% wool in each of three colors:
color A (skin tone)
color B (top)
color C (leggings)
I used Cascade 220 – whatever you use, be sure that it will felt!
size 8 (US) double-pointed needles
stitch markers in at least 2 colors
less than 1/2 skein of yarn for hair
embroidery floss for eyes and mouth
embroidery needle
tapestry needle
sewing needle & thread in color to match hair
small amount of polyester fiberfill (or stuffing of your choice)
sewing machine (optional)

knit the doll’s head (starting from the crown)
Using Color A, CO 6, distribute evenly across 3 DPN’s. Place marker and join to K in the round, being careful not to twist.
Round 1: K1fb into every stitch. 6 st increased.
Round 2 (and all even rounds): Knit.
Round 3: *K1, Kfb. Repeat from * to end. 6 st increased.
Round 5: *K2, Kfb. Repeat from * to end.
Round 7: *K3, Kfb. Repeat from * to end.

Continue in this manner, increasing 6 stitches on every odd-numbered round, until you have 60 stitches on your needles.
Knit 9 rows even (without increasing).

Decrease round 1: [K8, SSK] 3 times. [K8, K2tog] 3 times. 6 st decreased.
Round 2 (and all even rounds): Knit.
Decrease round 3: [K7, SSK] 3 times. [K7, K2tog] 3 times.
Decrease round 5: [K6, SSK] 3 times. [K6, K2tog] 3 times.

Continue in this manner, decreasing 6 stitches on every odd-numbered round, until you have 24 stitches remaining on your needles.
Knit 8 rows even for the neck

body
If you have ever knitted a sweater from the top down, this section is going to feel very familiar (and if you haven’t – perhaps you should try it!)

Round 1: K8, place marker, change to Color B, K4, place marker, K8, place marker, K4 to end.
Round 2: * Kfb, K to 1 st before next marker, Kfb, slip marker. Repeat from * to end. 8 stitches increased.
Round 3 (and all odd-numbered rounds): Knit.
Round 4: Repeat round 2. 8 stitches increased.

Continue in this manner, increasing 8 stitches on every even-numbered round, until you have 16 stitches between the back two markers (that is, in the largest section).

divide for arms
Without increasing any more, knit across to the first marker, remove the marker, and place the next 12 stitches on a piece of scrap yarn – this will become the doll’s left arm.
Remove the next marker. Using the backwards loop method, cast on 2 stitches to your needle and join to knit across the back 16 stitches. Remove the next marker, and place the next 12 stitches on a piece of scrap yarn to create the dolls’ right arm. Remove the next marker. CO 2 stitches again, join to the remaining stitches and knit to the final marker (leave this marker in place to mark the start of your rounds).

Now you will simply knit the torso in the round, continuing in st st until the torso measures about 3 inches.

leggings
Next round: Change to Color C. Knit 1 round in the new color.

Now we’re going to use some short rows to give the doll some booty:
K 20. Place a marker. K 14. Place a marker. Wrap the next stitch and turn your work. Purl back to the first marker. Wrap & turn.
K to 1 st before marker. Wrap & turn.
P to 1 st before marker. Wrap & turn.
K to 2 st before marker. Wrap & turn.
P to 2 st before marker. Wrap & turn.

Knit across this row, knitting the wraps together with their stitches as you go and removing all the markers. Continue knitting to the end of this round. Now your doll has a cute little heiney.

divide for legs
Next round: *K 4, K2tog. Repeat from * to end. 6 st decreased. 30 stitches remain on your needles.
Next round: K 5, bind off 3. Using a new needle, K 12. Bind off 3. Place a new marker and join to knit the next 12 stitches in the round as one leg, leaving the remaining 18 stitches behind on a stitch holder or a piece of scrap yarn.
Continue in st st until leg measures 3 inches.
Next round: Decrease 3 st evenly. 9 st remain.
Knit 4 rounds even.

make a foot
This will feel very familiar if you’ve ever made a sock.

Knit across 7 stitches. Turn your work.
Slip one, P2, turn.
Slip one, K2, turn.
Slip one, P2, turn.
Slip one, K2.
Pick up and knit 2 stitches down the selvedge of the heel flap you’ve just made. Place a marker. Knit 6. Place a marker. (Be sure to remove the original marker that marked the start of the round – it’s just in the way now).
Pick up and knit 2 stitches up the other selvedge of the heel flap.
K 3, K2tog. Slip marker, SSK. K2, K2tog. Slip marker, SSK. 9 stitches remain.
Knit 5 rounds even.

Next round: K2tog 4 times. K1. 5 st remain.
Cut the yarn, leaving about a 6-inch tail. Pull the end through the remaining 5 stitches, securing the yarn end inside the foot and weaving in a bit before you trim it.

second leg
Rejoin your yarn to the held stitches, and knit the 12 held stitches. Place a marker and join to knit in the round. Make this leg just as you did the first one, all the way to where the heel starts.

second foot
To begin this heel, Knit across 4 stitches, turn your work. Now continue exactly as you did for the first foot. Complete as before.

arms
Go back to the shoulder and place the held stitches from one of the arms onto your needles, removing the scrap yarn. Join your yarn (Color B) and knit the 12 held stitches. Pick up and knit the 2 armpit stitches from the torso, and place a marker to mark the start of the round.
Knit 3 rounds even.

Next round: Decrease 2 st evenly. 12 st remain.
Knit 1 round.
Next round: Decrease 2 st evenly. 10 st remain.
Knit 2 more rounds in Color B.

Change to Color A. Knit 4 rounds.

hand
Increase round 1: * K1, Kfb. Repeat from * to end. 5 st increased.
Knit 5 rounds even.

Next round: K2, K2tog. K to 2 st before marker, K2tog. Slip marker. Leave the next 2 stitches on a holder to make the thumb. Join your needle to the third stitch, and continue knitting these 11 stitches in the round.
Knit 3 more rounds.

Next round: [K1, K2tog] 5 times. 6 st remain.
Next round: K1, K2tog, K2tog, K1. 4 st remain.
Cut the yarn, leaving about a 6-inch tail. Pull the end through the remaining 4 stitches, securing the yarn end inside the hand and weaving in a bit before you trim it.

To make the thumb, rejoin your yarn to the 2 held stitches and knit a two-stitch I-cord for 4 rows. Break your yarn and pull the tail through these two stitches to secure them.

Repeat this whole process for the second arm.

doll, unfelted

finishing & felting
Once you’ve finished knitting your doll, go back to weave in ends and trim them up. You’ll have a big gap in the doll’s crotch for stuffing.

Carefully felt the doll to size. Need help felting? Here's a great tutorial.

Once she’s ready, stuff her very firmly with plastic bags. Push, pull and tug her into shape – don’t be too shy. Felted fiber is tough stuff, and the shape she dries in will be the final shape you get, so make her look just the way you want her to.

Allow the doll to dry for a couple of days. Once dry, remove the plastic bags and stuff more gently with polyester fiberfill (or your stuffing of choice). I like to stuff the head, hands and feet rather firmly, and the arms, legs and torso more softly. I am careful to stuff the joints (shoulder and hip) only lightly, to allow her to bend and sit. Stuff to the firmness that you prefer. Once you’re done, use your Color C yarn to sew up the stuffing hole.

hair
There are as many ways to make hair for a doll as there are home-made dolls. You can make yours however you like.

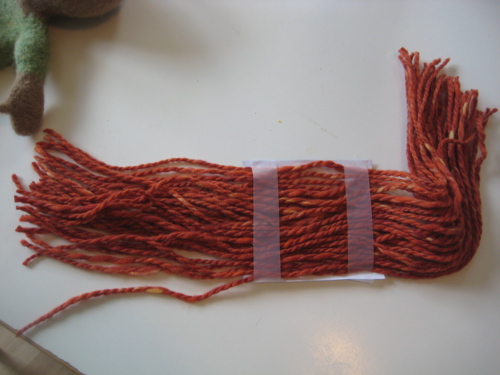
after winding

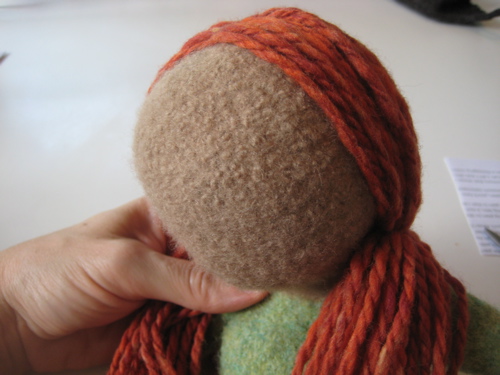
I made my doll’s hair by sewing the yarn down to a piece of paper, removing the paper and then tacking the hair into place on the doll (I thought it was kind of ingenious until I discovered that plenty of other people already did it this way). Here’s a great step-by-step tutorial from the Crafty Sheep.


Instead of using yarn to sew the hair into place, I sewed my doll’s hair along the scalp line with matching sewing thread. Then I neatly gathered the doll’s hair into a ponytail on each side, and secured those in place with sewing thread as well. Finally, I braided the hair, tied a piece of yarn to finish the braid, and trimmed to my desired length. Style your doll’s hair however you like! To make wavy or kinky hair, use yarn that has been unraveled from another knitted item.

doll with hair

here are a few other ways you can make hair:
Make a fringe
Sewn-on loops
Crocheted hair

embroidering the face
Here I’ll just say, I am horrible at embroidery. After unsuccessfully begging my sister to embroider the face for me, I finally sat down with the embroidery floss (two strands) and needle, and dove in. I think it came out OK. I marked the eye and mouth locations with a pencil first, and I think I held my breath the whole time. Good luck.

So, now hopefully your doll has a sweet face and is ready to play! Have fun, and don’t forget to make her some clothes! But she looks just as cute in her long johns.

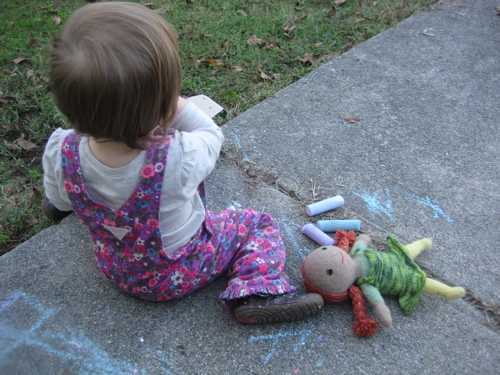
playing outside

Monday, October 25, 2010

pom-pom-a-rama

I got a new pom-pom maker over the weekend.

pom a rama

With it, I made 53 large green acrylic pom-poms.

This would never have been possible if I were still trying to use the flimsy bits of plastic that used to pass themselves off as a pom-pom maker around here. The nice ladies at Great Yarns sold me one of these schmancy new Clover doohickeys. For $8, I am a very happy pom-maker.

The pom-poms are for the Little Pea's Halloween costume. Can you guess what it will be?

This was so much fun that you may see more poms popping up around here (seriously: I wound 453 yards of yarn into poms and lived to call it "fun").

Hat needs some spark? Poms! Hoodie needs a little pouf on the drawstring? Poms! Fuzzy monster in need of headgear? You get the idea...

p.s. Keep an eye out this Friday for a new free pattern... The little felted doll I made for the Pea a few weeks ago has made it to Patternland. I hope you like it!

Tuesday, October 19, 2010

camping with babies

wayah bald 2

Well, I can't say that our camping trip was entirely successful.

It was not entirely unsuccessful either; in fact it was hardly unsuccessful at all.

The main unsuccessful part was the sleeping part. Or should I say, the not-sleeping part. The Little Pea wanted no parts of sleeping in a sleeping bag, but it was so cold. Thirty degrees overnight! There was ice in everyone's water bottles in the morning. She had to be in the sleeping bag. Was it the feeling of constraint, the slippery nylon fabric, the cold air hitting her face...? Who knows what exactly the problem was, but it was problem enough to have her wake up and howl with all her 16-month-old might, about every hour or so, all night long.

In the end, HWWLLB had to wrap her in a fleece blanket and then build a human/sleeping bag cave around her (not touching her in any way!) to keep her warm and get her to sleep more than 30 minutes at a stretch. I think she actually went for over an hour at one point.

You'd think that all this baby howling would scare away wildlife, but in fact, around 3 a.m. an owl answered her calls. Seriously. At the height of our misery came the most awesome moment of the whole camping trip.

Other than the all-night-howling, the trip was great. Beautiful crisp sunny fall weather, peak fall foliage, and good company with family and friends. The Pea had a great time getting to know lots of uncles and aunties and cousins. This was HWWLLB's annual family camping trip - four generations go camping together every October. Every family should do this! (But few dare...)

So anyhow, my advice to any would-be-family-campers, is this: test out the sleeping bag and the tent first. I cannot overstate the importance of the dry run. Oh, how I wish we had known.

On the bright side, the long car trip to and from camping was enough time to knit a pair of warm toddler socks. And soon, the pattern for the Little Pea's new doll will be making an appearance here. So stay tuned. Now to go make sure my supply of beer and salty snacks is in order for tomorrow night's Phillies game.