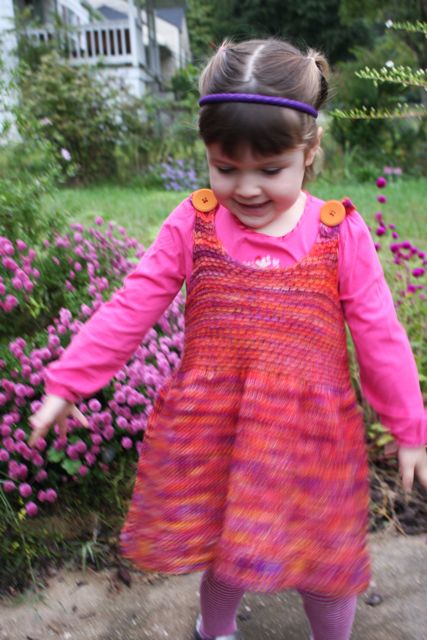
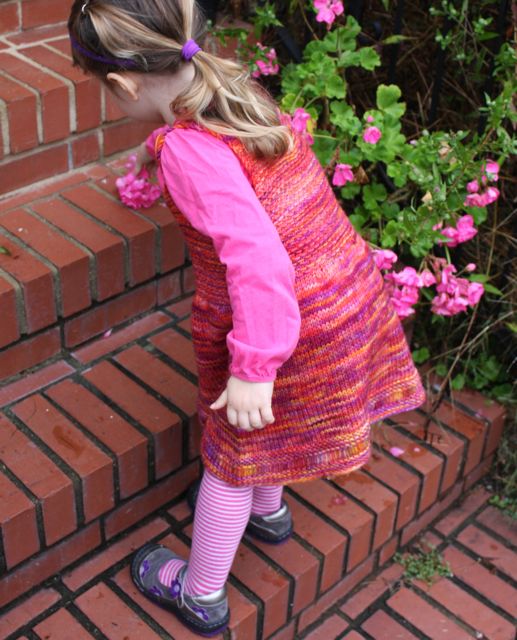
Thursday, November 08, 2012

late fall


We escaped the hurricane that brought such terrifying storms to our coast and mountains. All we got here in central North Carolina was some much-needed rain. I feel almost guilty enjoying some beautiful fall weather while my relatives on the Jersey Shore struggle though yet another storm knocking out their power and disrupting their lives.

But Nature is glorious around us right now, so I will take her on those terms and be grateful.

The other day HWWLLB cut down all the faded, raggedy-looking summer flowers from our front yard - mostly zinnias and gomphrena - and stuffed them into the yard waste bin. The Little Pea took the nicest of them to school for their flower-arranging activity. We've got several this-might-be-the-last-bouquet bouquets of salvia and asters all over the place. Every time I pick a green pepper or a stalk of basil, I say a little thank-you for the harvest, in the recognition that this might be the last of it.

At the same time, the greens and lettuce are sweetening with every cold night. Now that it's generally too cold for insects, I don't have to worry about the caterpillars munching on my baby broccoli and cauliflower plants. All I have to do is pull the occasional weed and fantasize about the delicious meals they will make soon. We have enough fresh salad greens for a much larger family, and a nice selection of dark leafy greens to round out any meal.

I'm awful at cleaning out the garden. I cling to the memory of the summer bounty, even if it is a hazy memory of what I wanted it to be, rather than a clear picture what it actually was. Once the stalks are spent and the disheveled vines are everywhere, you could forget that the cucumbers never produced or the squash were all mutilated by vine borers. It was a glorious summer garden. Now it's spent. I hate clearing away the debris afterwards, even though I know it would mean fewer disappointments next year from over-wintering marauders.

Right now my eye is on the leafy green things, wondering which of them will be sweet and tasty and abundant enough to grace our Thanksgiving table. There will be plenty of mustard greens, Chinese cabbage, Russian kale and red sails lettuce. The tatsoi will be my own little treasure that I keep just for myself (and the Little Pea), my very favorite green and one that I never seem to be able to grow very much of. In the freezer are two big tubs of roasted pumpkin, the surprise harvest from the volunteer pie pumpkin plant that came up in the middle of a vegetable bed and braved the vine borers to give us several adorable, perfectly round, bright orange pumpkins.

Surprises, disappointments, bitter and sweet. I'm giving thanks for a little garden that helps me ride out life's storms every season.

Friday, October 12, 2012

free pattern friday :: apiary jumper


This little sweater dress is all about the yarn. Choose a variegated yarn in bold colors with medium-to-long color changes – the stitch patterns in this dress will really show them off. And choose superwash if this garment is going to be a gift! The jumper is designed to be worn over a top and pants or leggings. The straps are adjustable, so your child can get 2 years of wear out of this sweet three-season tunic.
Yarn suggestions: Malabrigo Ríos, Brooks Farm Solana, Creatively Dyed Yarn Woodbrook, or Lorna’s Laces Shepherd Worsted. The dress shown was knit in Malabrigo Ríos in color #103, Archangel.

sizes: 12-18 mos (2-3 years, 4-5 years, 6-7 years)

measurements:
12-18 mos size: chest circumference: 20 inches.  overall length: 16 inches.
2-3 years size: chest circumference: 24 inches. overall length: 18 inches.
4-5 years size: chest circumference: 26 inches. overall length: 19.5 inches.
6-7 years size: chest circumference: 28 inches. overall length: 21 inches.

materials:
Malabrigo Ríos, 2 (2, 3, 3) skeins
Size 8 (US) circular needle, 24 inches
Size 6 (US) circular needle, any length
2 buttons, about 1-1/8 to 1-3/8 inches / 28 to 34mm
Tapestry needle
Sewing needle
Sewing thread to match

gauge:  20 stitches / 4 inches on size 6 needles in stockinette stitch


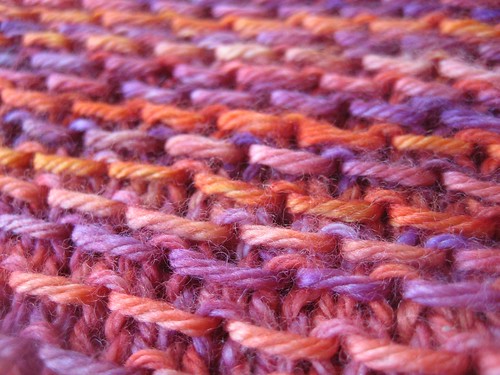
slipped honeycomb stitch
work over an odd number of stitches
R1 (RS): Knit
R2 (WS): K1, *Slip 1 with yarn in back, K1. Repeat from * to end.
R3: Knit
R4: K1, *K1, Slip 1 with yarn in back. Repeat from * to end.

You will begin this dress at the lower edge and knit in the round on circular needles.
Note to the purl-averse: The first 14 rounds are based on garter stitch, so if you’re one of those people who can’t stand purling, knit the first 14 rounds flat and sew them up later.

Using larger needles, cast on 125 (151, 163, 175) stitches, place a stitch marker, and join to knit in the round. Knit the first 6 rounds in garter stitch (alternating knit and purl rounds).
Round 7: K1. Knit, wrapping three times for each stitch, to end.
Round 8: Purl, dropping all the extra wraps.
Knit 6 more rounds in garter stitch.
Change to stockinette stitch. Continue knitting in the round until dress measures 9 (10, 10, 11) inches from cast-on edge.


Decrease for bodice:
Change to smaller needles. *Knit 7, work a centered double decrease. Repeat from * to end. As you come to the last 5 (2, 3, 5) stitches, K2tog, K to end. 100 (120, 130, 140) st remain.

Centered double decrease:
Slip 2 stitches together knitwise. K1. Pass the slipped stitches over the knit stitch. 2 stitches decreased.

You will now divide the front and the back of the dress, and knit each side of the bodice flat in Slipped Honeycomb stitch. Just hold the back half of the dress on scrap yarn while you work the front.

Front:
R1: K 51 (61, 65, 71) place the remaining 49 (59, 65, 69) stitches on scrap yarn to hold. Turn, work row 2 of Slipped Honeycomb stitch.
Continue knitting this section in the stitch pattern for 2 (2, 3.5, 3.5) inches.

Make armholes

Note: Through the rest of the bodice and the straps, you will begin every row with a slipped stitch, with the yarn held in front (WYIF). This creates a very tidy, even edge for any garter stitch-based stitch pattern and eliminates the need for a border to be picked up & knit or sewn on later.

Note also: Throughout the remainder of the bodice, you will continue to work the honeycomb stitch pattern as established. Because of decreases at many row ends, you will sometimes need to work row 2 instead of row 4 of the honeycomb stitch, or vice-versa. The important thing is to keep the slipped stitches staggered as established when you began working the pattern – this is easy to follow with your eye.

Decrease row (RS): Slip 1 WYIF, SSK, SSK, K to the last 5 stitches. K2tog, K2tog, K1 (4 st decreased).
Next row (WS): Slip 1 WYIF, K to end (maintaining pattern).

Repeat the last two rows 2 (4, 4, 5) more times, until 37 (41, 45, 47) stitches remain on the needles.

Sizes 12-18 mos, 4-5 years:
Next RS row: Slip 1 WYIF, SSK, K to last 3 stitches. K2tog, K1. (2 st decreased)

35, (41, 43, 47) st remain.

Continue working in patt until the bodice section measures 3.5 (3.5, 5, 5) inches.

Work neckline:
* *You will still slip the first stitch of every row (RS and WS) with yarn held in front!**
Next RS row: K16, BO 3 (9, 11, 15), K16.

Right front:
Keeping the first section on a holder, work the second section of 16 stitches, maintaining the honeycomb stitch pattern and the first stitch slipped every row.
WS: Knit in patt to end of row (neckline).
RS: Slip 1 WYIF, SSK, SSK, patt to end. (2 st dec).
WS: Turn, patt to end of row (neckline).
Repeat these last 2 rows til 10 stitches remain.
Next RS row: Slip 1 WYIF, SSK, patt to end. 9 stitches remain.
Continue working these 9 st in honeycomb stitch pattern for 3 more rows.
Next RS row, work buttonhole: K3, BO 3, K3.
Turn, patt 3, cast on 3 st using backwards loop cast on, patt 3.
Work 2 more rows in patt.
RS: Bind off all stitches as follows: Slip 1 WYIF, SSK, BO all stitches to last 3, K2tog, BO.

Left front:
Join yarn to held stitches at the neckline to work the left side.
WS: Knit in patt to end of row.
RS: Slip 1 WYIF, patt to last 5 stitches, K2tog, K2tog, K1.
You will work the left front just as you did for the right, but working your neckline-edge decreases as K2tog’s (as instructed for previous 2 rows).
Work buttonhole and bind off as you did for the right front.


Back:
Join yarn and work the back as you did for the front, right up through the armholes. Work the armhole decreases until 35, (41, 43, 47) st remain.

When the back bodice measures 4.5 (4.5, 6, 6) inches, work the back neckline exactly as you did the front.
However, once 9 stitches remain on each side, do not work a buttonhole.
Instead, work these 9 st in patt until each shoulder strap measures 3.5 (4, 4.5, 5) inches from the point where you separated out the two sides. Bind off on the RS, using decreases to shape the ends just as you did on the front side.

Finishing:
Sew up the sides below the armhole.
Weave in all ends.


Button placement:
Wash and block the garment before sewing on buttons. Try the dress on the intended recipient if you possibly can, using safety pins to mark where you want the buttons to go. If you can’t try it on the child first, the default setting is to sew on the buttons such that the finished armholes measure about 5 (6, 6, 6.5) inches. Stretch the straps gently as you measure, since these straps will stretch a bit lengthwise during wear.

If the dress is to be given as a gift, wind a generous length of sewing yarn around a small card and present it with the dress, so that the buttons may be moved down the strap as the child grows (you may wish to offer to provide this service to the recipient’s parent, since many people today are unfamiliar with domestic arts like button-sewing).


Tuesday, October 09, 2012

new free pattern coming friday!


One thing about being at home with a new baby: I have time for knitting.

Not for sitting in a cozy chair for hours with yarn, This American Life and a cup of tea knitting, but for ten minutes snatched here and there. That's certainly enough time to make progress on hats, socks, mittens and baby gear.

Anyway, I've been working on a hat for the Little Bee to serve as her Halloween costume. Based on the available yarn in my stash, she is going to be a fish. I'm having fun adapting this little bonnet pattern into a fishy-looking headpiece. Hopefully it will be worth the effort!

And some truly amazing news: I have a new Free Pattern Friday coming! I designed and knit this dress (pictured above) for the Pea and for our friend Vee months ago, and have been way behind on silly things like sewing on buttons and proofreading the pattern... but it's finally just about ready! Just need to add photos to the pattern.

I hope it will make some fun fall knitting for someone with a little girl in their life. Til Friday!

Thursday, October 04, 2012

build a backyard sand table


The Little Pea loves to dig in the sand. When we go to the playground, she often spends the whole time sprawled barefoot in the sandbox, happily building and destroying towns, castles and farms.

With a new baby on the way, we decided we needed to make our backyard more fun, since trips to the playground and the museum might slow down a bit this fall. So we built our own sand table. It was really easy and cost us less than $20 total. A retail sand table starts at $30 for a very small & chintzy model, and I've seen them sell for more than $100. I think the Pea especially loves hers because she helped us build it.   

Here's what you'll need:

- An under-the-bed storage box with a lid (about $7 at the store, or you might already have one).
- A wooden crate or small coffee table to mount it on (we had one sitting in the garage).
- Four large, flat screws with washers (about $1.50 from the hardware store).
- An electric drill with a small drill bit (we used a 1/16-inch bit).
- Two 50-lb bags of play sand ($5 each at the hardware store).
- Assorted sand toys (repurposed yogurt containers work great if you don't have beach toys).

Mount the storage box on the crate or table


First I positioned the storage box on the crate just the way I wanted it to go, and then drilled holes for each of the four screws. 


Then I screwed each one in place with a washer in between, which I thought might help the plastic last longer without cracking.

Drill some small drainage holes


I drilled lots of tiny drainage holes all over the bottom of the storage box so that if (when) the Pea dumped water into the sand table, it would have a way to drain out. I wanted the holes to be large enough to let water through, but not so large that sand would leak out. We used a 1/16-inch drill bit. If I had it to do over, I would probably go one size larger.

Fill the play table with sand


This part was fun for all of us! Two big bags of sand were plenty. The storage box was quite full, but that's okay because it wasn't long before sand started migrating all over our yard.

Keep it covered


We were sure to get a box with a tight-fitting lid to keep out the rain. Make sure to cover it up whenever your child is done playing - nothing worse than an unexpected thunderstorm to turn your sand table into a mud pit. If it does get very wet, just leaving the lid off on a couple of sunny days dries it out pretty well.

Have fun!


The Little Pea and her friends spend a lot of time at this table. It's fun to watch how they combine the sand play with other activities in the backyard, like garden digging, restaurant, and "beach" play with the wading pool. I'm looking forward to seeing what else they do with it, with the onset of lovely fall weather and more time outside.

Wednesday, October 03, 2012

welcome, little bee


The newest member of the Pea family arrived last week. This is the Little Bee.

It was a wonderful day for our family. Bee was born on September 27th, my father's birthday. He would have been 63 - we gave her his name to celebrate. He was very much with us throughout the anticipation and the arrival.

It has been indescribably sweet to see my family so full of joy. I feel a deep, contented, peaceful happiness that I've never quite experienced before. It's wonderful.

The Little Pea (not so little anymore) is a terrific big sister. She loves the baby and is all about helping her parents care for her. She's also on emotional high gear as she adjusts to sharing us with her sister, which has been a bit of a roller coaster. Luckily the breastfeeding hormones are keeping me happy and spacey, which helps a lot with toddler management.

Looking forward to knitting itty bitty things again. Next up I think will be a funky animal hat for Hallowen. The Pea is going as a parrot. What should the Bee wear?

Monday, September 24, 2012

tutorial :: sewing a button very very securely


So you've made a beautiful little baby cardigan and all it needs is five adorable buttons to finish the job.  But buttons are a choking hazard on baby clothes! Oh dear. One good solution is to use a zipper or ties instead, but if buttons are your closure of choice, you need to make sure that you sew them on for dear life (Find more tips for making great baby gifts here).

You may also be one of those knitters who loves buttons, as I do, and invests real time and money in finding beautiful and vintage buttons and buckles to finish your projects. The last thing you want is for them to fall off in the wash!

There are just as many right ways to sew buttons as there are wrong ways. This is my favorite. I begin with a visualization: the wearer of this sweater has just fallen off a cliff. The button catches on a branch, and that one little button is the only thing standing between the wearer and the abyss. Will the button hold?? The outcome is entirely up to you. Now start sewing:

Thread the needle


This may be a completely obvious step, but choose a short, thin, sharp sewing needle. Tapestry needles are much too thick to fit through most button eyes. Pull a length of thread about the length of your arm (I use polyester/cotton blend thread). Thread the needle, and pull the thread length until the two ends meet - so that your thread is doubled. 

Set up and positioning


Find the right spot for your button by laying out the garment and lining up the button bands. Then flip to the wrong side of the garment and run the needle through a short length of garment to hide your ends. I like a little extra thread end beyond a knot, but you need to hide it inside some knit stitches so that it's not hanging loose (I don't leave long ends hanging like in the example photo above - that's just to make it easier to see). 

Now knot your thread twice. To sew a knot, put the needle through a small amount of garment to make a tiny loop. Stick the needle through the loop and gently pull taut. Voila! A nice secure knot. Once you've made two of these, put your thread through to the front side. On the front side, get your position just right by running the thread through a couple of knit stitches once or twice. Then put the button into place. When you sew the button on, you will take the thread all the way through to the wrong side of the garment, and then bring it back to the front through the button's eye. 


If your button has only two eyes, then take the thread back & forth through the garment & button eyes at least 8-10 times, or more if you still have room and it doesn't look too wonky. 


If your button has four eyes, then take the thread through 6-8 times for the first half of the cross, then another 6-8 times for the second half of the cross. 

Wrapping the button firmly


Once your button is sewn into place, you will wrap it up tightly with the remaining length of thread. Bring the thread from the wrong side to the front of the button band through the button eye one last time. Now take the needle back through the button eye, but not the garment. Your thread should be sticking out from under the button, on the right side of the garment.  Wrap the thread firmly around your stitch-work about ten times. Now take the needle through to the wrong side of the garment again. On the wrong side, knot it twice and then run your needle through a few stitches to hide the thread ends.


Trim your thread ends (don't leave long tails like in my example photo), and admire your tidy, life-saving button work. I like to button up the garment after every button just to super-duper double-check the position before moving on to the next one.

Hopefully this little tutorial will make you a more confident knitter of baby garments. Do you have other tips and tricks for button sewing? Please share them in the comments! 

Friday, September 21, 2012

back on the knitwagon!


For the last six months, I haven't touched any knitting. Haven't even thought about it (except occasional pangs of guilt). It was like I left it behind in the cold hospital room where I spent so many hours worrying over my yarn by my Dad's bedside.

In June we drove 10+ hours each way to New Jersey and back. I packed some knitting and glanced at it once or twice, but never even picked it up.

I remember that I had a hard time knitting during my last pregnancy, particularly the first trimester. I think this time, the combination of pregnancy and mourning basically obliterated my creative energy.

But now, full-term baby aboard, the urge to work the yarn is back in my fingers. I guess this is nesting?

I started working my way through a tower of UFO's perched on top of my knitting & crafts cabinet. It felt really good to wrap up some of those projects - especially the ones that needed no more than a button sewn on, or to be washed and blocked!

Once the backlog was clear, I wanted a little organic cotton cap for the new baby to wear when she's born. It went quickly and I decided to make another for a friend's new baby.

That done, I found an indecipherable pile of half-begun knitting in a project bag, frogged it and got to work on a beret and mitten set made from some utterly scrumptious Misti Alpaca handpaint sock yarn. It was supposed to be for me, but the beret is turning out rather small and it may wind up being a nice surprise for the Little Pea.

This was all in the last week. I wonder what next week holds??