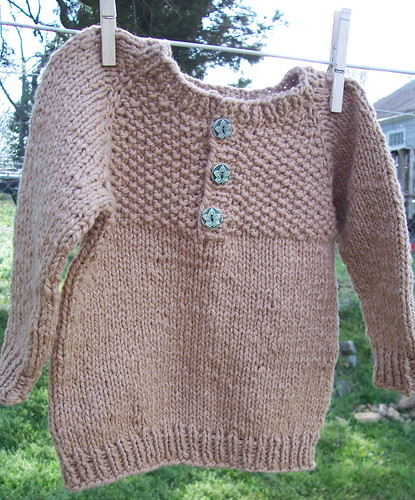
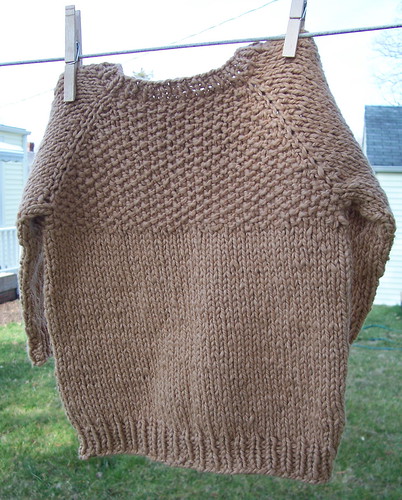
I really like neutral colors on babies. I also really like knitting with organic cotton, especially when making garments for little ones. This little pullover features both, with some simple detailing to make it special. Buttons at the front collar make this easy to get baby in and out of, and the basic shape makes it work for a girl or boy.
If you're knitting for a little girl and like some frills, you can add an I-cord flower or some other embellishment to sweeten the sweater just a little. But don't go wild - this garment's appeal is in its simplicity.
[Edited 1/1/2010 to correct error in Row 1]
materials
- 3 skeins Blue Sky Alpacas Organic Cotton (100g, 150yd), shown in color #82, nut
- US size 7 circular needles and DPN's
- US size 5 circular needles and DPN's
- 3 3/4-inch buttons
- tapestry needle
- scrap yarn to hold sleeve stitches
- stitch markers
size: 6 (12, 18) mos
measurements: chest circumference: 19 (21, 23) inches; back length: 10-1/2 (11-1/2, 13) inches
pattern notes:
- this sweater is worked top-down, knit in the round.
- make all increases (inc) by knitting into the front and back of the stitch (Kfb).
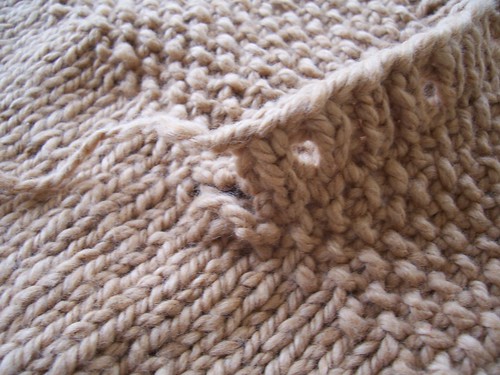
- as you begin the sweater, you will be knitting the front and back sections in seed stitch (K1 P1 on the first row, and on all successive rows, K the P's and P the K's), and the the sleeve sections in stockinette st (K on the front, P on the back).
starting at the neckline
Using larger circular needles, CO 2, place first marker, CO 8 (8, 9), PM, CO 10 (13, 14), PM, CO 8 (8, 9), PM, CO2. Total CO st: 30 (33, 36).
Row 1: Kfb of first stitch. Kfb of the stitch before the next marker, slip marker, Kfb. K to 1 st before next marker, Kfb, slip marker, Kfb. K1P1 to 1 st before next marker, Kfb, slip marker, Kfb. K to 1 st before next marker, Kfb, slip marker, Kfb. Kfb of last stitch.
Row 2: Purl all st st in the sleeve sections (between markers 1 and 2, and between markers 3 and 4). In the front & back sections (outer sections and the section between markers 2 and 3), knit in seed st (K all P's and P all K's).
Continue in this manner, increasing at the first and last stitch of every RS row, and increasing before and after every marker on the RS rows, remembering to use seed st in the front & back sections and stockinette in the sleeve sections. For the seam stitches (the stitches on either side of each marker), always K on the RS and P on the WS.
Continue until you have 18 (19, 20) st in the back section. From this point on, do not increase the first & last stitch of the row anymore (you will continue increasing at the markers, however).
Next RS row, patt to end of first row, then CO 2 st to the needle tip at the end of the row. Turn work and patt to end, then CO 2 st to needle tip at the end of the row. Continue knitting as you did before, increasing on the RS rows (but not at the first & last st). Continue until there are 30 (33, 36) st between the two markers in the back section.
divide for sleeves
Next RS row: Patt to M, remove, K1. Place shoulder st (to next M) on a piece of scrap yarn to hold for later. CO 3 (4, 4) st to the tip of the needle. Join to back section, patt to next M, K1. Place rem shoulder st (to next M) on scrap yarn. CO 3 (4, 4) st. Patt to end.
Cont in patt 5 rows more (all your stitches are now in seed st).
join to knit in the round
Next RS row: Change to stockinette st. K to the end of the row, CO 2, PM, join to K in the round. K in round in st st until garment measures 9-1/2 (10-1/2, 12) in. from back neck.
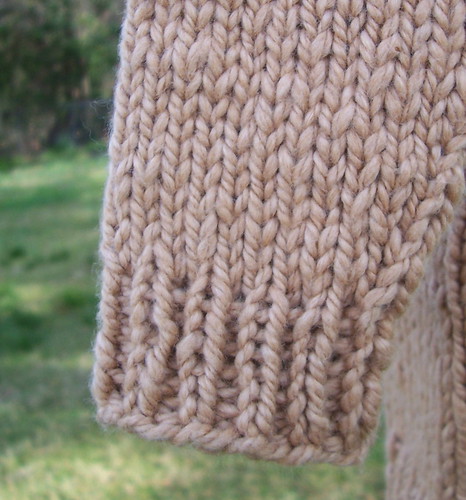
Change to smaller needles and knit 1 in. in K1P1 rib. BO loosely using larger needles.
sleeves
Using larger DPN's, place the sleeve stitches from scrap yarn onto the needles, then join the yarn and pick up the 3 (4, 4) armpit st that you cast on when dividing for sleeves. PM for start of round. K 4 rnds.
Dec row: K1, SSK, K to last 3 st, K2 tog, K1 (2 st dec).
K 2 (3, 4) rounds, dec 2 as above.
Continue decreasing 2 st every 3 (4, 5) rows until 18 (20, 22) st rem. K until sleeve measures 6 (6-1/2, 7) in. from armpit.
Change to smaller DPN's. K1P1 rib until sleeve measures 7 (7-1/2, 8) in. BO loosely using larger needles.
placket & collar
Left side placket: Using smaller circular needle, pick up 12 (14, 16) st (you will be picking up around 3 out of every 4 st).
R1: K1 P1 rib.
R2 (buttonhole row): K1, YO, K2 tog. Patt 3 (4, 5) st. YO, K2 tog. Patt 3 (4, 5) st. YO, K2 tog. Patt to end.
R3: K1P1 rib. BO loosely using larger needle.
(Note: When making the buttonhole row, it may make more sense to use a P2tog - rather than a K2tog - to maintain your ribbing. Use whichever is appropriate).
Right side placket: Pick up 12 (14, 16) st along the right slit. Knit 3 rows in K1 P1 rib. BO loosely using larger needle.
collar
Using the smaller circular needles, beginning at the right placket, pick up 3 st from the right side placket. Pick up all right front st, all right shoulder st, all back st, all left shoulder st, all left front st, and 3 placket st from the left side. Knit 3 rows in K1 P1 rib. BO loosely using larger needle.
finishing
Sew down the plackets with the left side (buttonhole side) on top.
Mark placement for 3 buttons and sew buttons into place.
Weave in loose ends.
important notice: This is a free pattern and you are welcome to use it for all the non-commercial purposes you like. However, you may not reproduce this pattern to sell, and you may not sell what you make with it. You may donate what you make with it to charity, and you may use it for charity fundraisers only if 100% of the proceeds are donated to the charity (and by charity I don't mean your kid's college fund). Thanks for understanding!
Hi Pea,
ReplyDeleteThank you for making up such nice patterns and sharing them with everyone. Do you think you'd start a gallery of the things people have made from your patterns?
I have your cardigan pattern and this one and when I get to doing them I'll send you a picture, if you want.
You are generous.
Hi Pea - I wold love to exchange a couple of my own designs for baby sweaters with you.
ReplyDeleteThank you so much for this one.
Get in touch and they are yours!
No1grandma@gmail.com
with love
Yvette
I'm so impressed that you can design such beautiful patterns. Thank you for sharing the pattern! When I knit this up, I'll be sure to send you a picture.
ReplyDeleteyou are so good! this is such a sweet little pattern. and organic cotton... ahhh.
ReplyDeleteCute sweater! Thanks for sharing. :)
ReplyDeleteI think it's interesting that you say you like neutral colors on babies. I've done some non-baby colors and get tons of grief for it from my mother! LOL I just did a baby sweater in dark sage green and she keeps saying 'yuck' every time she sees it! Ha, ha, ha...
Karyn
that is cute! I almost waited for Friday to see this one, but started the Mossy sweater on Thursday anyway! I love it and your pattern is easy to follow and is knitting up like a dream!
ReplyDeleteso cute!
ReplyDeletewe will have to link
to this on
our
sew green post.
xo
I just finished this sweater and love it. Thanks so much for the pattern!
ReplyDeletedelightful pattern...thank you for sharing!
ReplyDeleteThis comment has been removed by a blog administrator.
ReplyDeleteThank you for this pattern, it's a pleasure to knit it !
ReplyDeleteyou're a beautiful person, pea :)
ReplyDeletei've been to all your friday specials and your photos, and plants and you kilim and your female cat (and cried).
i am Zaz on ravelry.
OX
What a cute pattern!
ReplyDeleteThank you very much for such a wonderful pattern. I love that you said I could make it and donate it to charity.
ReplyDeleteI hate to be that person...but I'm on Row 1 and confused. I only see you have three places to slip markers but you had us place four markers. I must be missing something.
ReplyDeleteComfort Wool: Hmm, not enough Slip M's! I will correct the pattern forthwith - thank you for catching the error!
ReplyDeleteBottom line: Knit into the front & back of the first stitch, as well as into the front and back of the stitch before and after each marker. Then knit into the front & back of the final stitch. You've increased 10 stitches.
I got that figured out, but I guess depending on where you place the missing slipped marker the seed stitch portion will be corrected. As it stands, the seed stitch placement is on the sleeve, right? I'll wait for the revision.
ReplyDeleteThanks
I see the revision! Thank you!
ReplyDelete1. Hello all,
ReplyDeleteWe are Giulietta Lorenzini and Marina Simone, moderators of the Knitting World for the World Blue Forum .(http://www.megghy.com/forum/).
Some time ago another moderator of our forum, Mrs. Barbara Ajroldi, asked your permission to translate one of your models and to make the translation available to the users of the forum.
But since Mrs. Ajroldi has recently left our community, we would still like to keep the translation available for our users.
Would you be so kind to let us know if we could keep the translation available on the forum for our members? If it is not possible, we’ll remove the translation from the forum.
Thank you in advance,
Best regards.
Giulietta Lorenzini and Marina Simone
I am finishing up on my attempt at this pattern. I completed the first placket and failed to put buttonholes in it. So, mine will have the buttonholes on the opposite side. I used the directions for the 6 month size but worked 3 strands of dk weight yarn and larger needles and wound up with a 4y/o size. I failed to make the notations of needles used. So, after picking it back up to complete the sleeves, after the piece had been put aside for several months and moved to different locations, I forgot what size needles with which I began. I'm thinking it's close.
ReplyDeleteThanks so much for sharing this pattern!
Thanks so much for designing this pattern. It's just what I had in my mind's eye for my grandchildren this year!
ReplyDeleteSo glad you like it! I hope you enjoy knitting it & post a photo when you're done!
DeleteHi Pea, i just love this pattern BUT i need that pattern in a large size. Do you know how to make the pattern to fit a large size person please.
ReplyDeleteHi there! Sorry I haven't written larger sizes for this design - this is just for a baby sweater.
DeleteLove this pattern, How can I print it?
ReplyDeleteMy granddaught chest is 20 in., but your pattern says 21 in. for 12 mo. She's 3 yrs old. Would it fit her?
ReplyDelete