My theory about this is that it seems too hard to keep up the stitch pattern, when you keep increasing stitches along the raglan seams every other row. Hm. I started puzzling over how one would carry the stitch pattern across those pesky ever-growing seams. Could it work? I decided to consult The Oracle (also known as Barbara Walker's classic book Knitting from the Top).
The answer is an emphatic yes, and though I didn't quite understand Walker's explanation, her hints were good, and eventually I found my way. So here's what I learned. You can use this technique to design your own garments, or to adapt an existing pattern for a top-down garment that was written in stockinette stitch, and make it fancy.
There are a couple of important things to know. First of all, you don't actually carry the pattern across the raglan seams. You start the stitch pattern over afresh after each raglan seam. This flash of insight made the whole thing work for me. The rest is just logistics.
But a second, and really important point, choose your stitch pattern carefully. Choose a stitch pattern with relatively few stitches in the repeat. A 14-stitch repeat won't look very good. A 3- to 5-stitch repeat will work just fine.
Let's use a sample pattern and walk through how to do this, step by step. We'll make a simple top-down baby's cardigan, except we're going to dispense with the plain stockinette stitch, and knit it up in a pretty stitch called "elongated rib check."
Elongated Rib Check (multiple of 4 st)
Rows 1-6: * P2, K2; Repeat from * to end.
Rows 7-12: *K2, P2; Repeat from * to end.
Here are the original directions for casting on (these should be familiar if you've ever knitted a top-down cardigan):
Beginning at neck edge with a 24 in. circular needle, cast on 2 st, place marker, cast on 10 st, place marker, cast on 16 st, place marker, cast on 10 st, place marker, cast on 2 st. You will have 40 st.
Odd rows: Kfb, *Knit to 1 st before M, Kfb, slip M. Repeat from * to end, Kfb the final stitch (inc 10 st total).
Even rows: Purl across.
Repeat these two rows until there are 22 st between the back markers.
At the end of this last increase row, cast on to the end of the needle 3 st.
Next row: Purl to end, cast on 3 st to the end of the needle.
Continue increasing as before, except without increasing on the first and last stitch of every row (inc 8 st every odd row).
Here's the step-by-step to transforming this top-down stockinette sweater to a top-down sweater with our chosen stitch pattern:
1. Supplies. You will need lots of stitch markers in 2 different colors (color A and color B).
2. Take notes. Keep notes on how you modify the pattern so that you'll be able to adapt as you go along.
3. Knit a swatch. This is no joke! You need to knit a nice big gauge swatch in order to a) learn the stitch pattern and get comfortable with it; and b) check your gauge, since it is very likely to be different from the sweater's stated gauge in stockinette stitch. You may need to adjust your needle size accordingly.
4. Casting on: As you cast on, you may need to modify the number of stitches in each section in order to accommodate the stitch pattern. Since the stitch pattern in our example is a multiple of 4, each section should contain a multiple of 4 st, plus 2 (one for each increase stitch).
If the front sections are just a stitch or two each, as in our sample pattern, adding too many stitches will mess up your sizing. In this case, you will just ignore those sections for now, and do not begin the stitch pattern until you've knitted enough increase rows that there are enough stitches in the section for one pattern repeat + 2 extra stitches. So for our example:
CO 2, Place marker A, CO 10, place marker A, CO 18, place marker A, CO 10, place marker A, CO 2. You will have 42 st. Make a note of the fact that you modified the instructions to have 2 extra stitches between the back 2 markers.
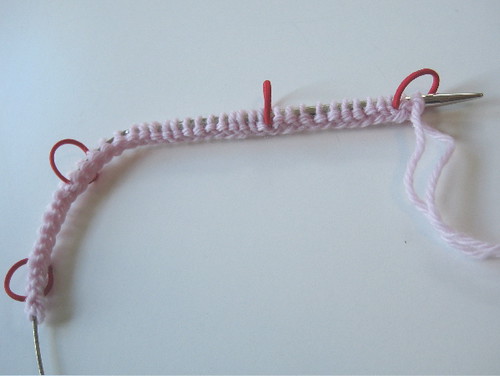
after casting on - looks just like any old top-down sweater.
5. Knitting in the stitch pattern. As you knit along, you'll start the pattern row over in each section. But you also need to differentiate between the stitches that are used only for increasing, and the stitches that can actually be knit in the stitch pattern. So as you knit row 1, you'll add a second set of markers, Marker B.
Row 1: Kfb, place marker B, Kfb, slip marker A, *Kfb, place marker B, patt to 1 st before next marker A, place marker B, Kfb, slip marker A. Repeat from * to final marker A. Kfb, place marker B, Kfb of last stitch.
Row 2: Purl to marker B, *Purl to marker A, purl to marker B, patt to the next marker B. Repeat from * to final marker B. Purl to end.

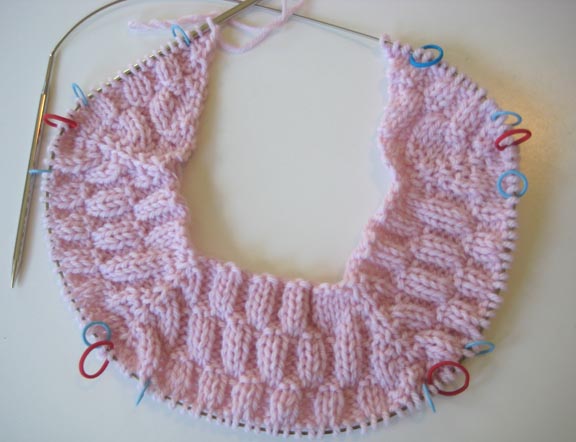
after row 1 - 2 sets of stitch markers (A is red; B is blue)
6. Maintaining the pattern as the sweater grows. On every increase row, you'll gain more stockinette stitches in the little sections between marker B and marker A. Once there are enough of them, you can add them to the pattern section by moving the marker. In this case, you will need 5 stockinette stitches (a multiple of 4 + 1). Once there are 5 stitches between marker A and marker B, on the next increase row, carry the stitch pattern through those 4 stockinette stitches, moving the stitch marker 4 places and leaving one stockinette stitch behind for the increase.

7. The front edges. In every top-down sweater, there's a point when you stop increasing on the first and last stitch of every row, and you cast on a few stitches at the needle tips to make the front edges meet, across the low point of the neckline. This is the final part of the sample pattern, above. This is the final adaptation you'll have to make. Our sample pattern says to cast on 3 stitches. You should cast on as many stitches as it takes to complete a pattern repeat, as close to the recommended number as possible.
So if you have, say, 20 stitches in your first and last sections (NOT counting the stockinette stitches between marker B and marker A), you would cast on 4 for a total of 24 stitches, which is a multiple of 4.
If you're making a crew-neck rather than a cardigan, you'd be joining the front edges here. In that case, cast on the correct number of stitches to make the stitch pattern flow correctly from one side to the other when joined, sticking as close to the recommended number of cast-on stitches as you can.
From this point, there's nothing else special that you need to do - just continue the sweater as directed, taking any of your modifications into account when stitch totals are given, and transforming the little growing pockets of stockinette stitch between your markers into fancy-stitch as they pile up.
I know it might sound weird to have these areas of stockinette stitch breaking up your stitch pattern, but in a finished garment you really don't see it. I used this technique in the Plum Blouse that I finished recently - here's a close-up of the shoulder seam. If you were to use a stitch pattern that required a 18-stitch repeat, it would definitely not work. But for stitch patterns that use a 3 to 5-stitch repeat, this is a great way to make a simple top-down design a lot more interesting.
umm...never? well, certainly rarely, but i think that's out of knitterly laziness, or the glass of wine and flashy picture box that accompany my own knitting...
ReplyDeletewhat about 'memories of ukraine' from natural knitting? it's actually a great pattern and i think it demonstrates marvelously how to sneak increases in, unobtrusively.
another inspiration -- a friend was showing me a book of socks that included wonky increasing that danced around the top of the foot in pretty patterns. it seems that the location of the increases didn't matter so long as there were increases (or decreases, depending on whether your socks are being knit top-down or bottom-up). i've never tried it, but i've always thought it would be interesting to see a top-down yoke sweater knit with increases in an unusual pattern.
I wanted to thank you for taking the time to explain this technique. As much as I love to knit sweaters from the top down (normally baby sweaters for charity)...the same ole' stocking stitch or garter gets "oh so boring" after a while. I've saved your turtorial and plan of giving it a try.
ReplyDeleteThat is more than genius! I have recently been thinking about this exact problem and working up samples with increasing, but I definitely hadn't made it to the revelation of starting the pattern over in each section. Thank you for making this so clear. The extra markers will keep my brain from overheating. =)
ReplyDeleteHello,
ReplyDeleteWould this work with fisherman's rib? My father had a sweater in fisherman's rib. He gave it to me a few years ago. It shrunk in the wash and it does not fit me anymore. I would like to make myself another one.
Thank you,
Julie
Julie: I think it would work, since Fisherman's Rib is a 3-stitch repeat. As long as you definitely want raglan sleeves!
ReplyDeleteGreat tutorial! Thanks for sharing it.
ReplyDeleteSuzy
http://slimsuzy.blogspot.com
Hi,
ReplyDeleteFirst, thanks so much for these instructions. Knowing that the pattern isn't carried across a section but starts over was a big lightbulb moment for me too! I'm doing a simple moss stitch, since this is my first top down raglan, but I'm wondering if I should stick with a stockinette until I get this figured out.
I'm a bit confused as to what would be row 3. I'm not sure where to increase relative to the markers. I noticed that the row 1 instructions don't seem to match the picture (it would appear that the first and last marker Bs are missing), so maybe I'm being thrown by that. I just can't seem to figure out where to increase now.
Thanks Again.
Helen
Hi Helen,
ReplyDeleteFor your very first top-down, I think I would stick with stockinette, until the technique becomes comfortable. Then you can go crazy with the stitch patterns. If you don't already have Barbara Walker's book -- do get it! Once top-down knitting feels familiar to you, this will be a snap. Just don't overthink it (always my problem!).
Thanks so much for the tutorial. I'm knitting Bumpy for my granddaughter (gorgeous BTW) and I kept losing my place by not using the extra markers. I think I've got it now.
ReplyDeleteTammy M.
Cape Cod, MA
Very useful tutorial. The only question I have is how to continue the pattern when you cast on stitches to go under the arms. Do you have to make sure that there will be enough for a repeat or would you just continue in stocking stitch?
ReplyDelete